The complete DIY guide with screenshots of every step and written for a foodie to help start a recipe or food blog in under an hour.

Are you looking to start a recipe or a food blog? Here’s why you’ll love this guide:
- For Foodie People – This guide is detailed with easy to follow details for the non-tech food enthusiasts.
- A Step by Step Guide – This guide is for those who wish to create their first recipe or food blog.
- You Can Ask For Help – I offer free help via email or even WhatsApp. I’m more than happy to answer all your questions and clear any doubts you may have.
I have split the complete process into seven steps.
Steps to Start A Recipe/Food Blog
Here are the main steps for the guide:
- Register a Domain name
- Choose a reliable Hosting.
- Setup WordPress
- Selecting the Right Design
- Install Google Tools
- Install Basic WordPress Plugins
- Create Pages
Is Starting a Recipe Blog Right for me?
My wife kept her recipe written in a diary. I told her to move them over to a website. As and when she makes something, click a picture of it and put it online. That was the idea of the first recipe blog. It got a lot of popularity.
So, if you have a passion for cooking, a recipe blog can be fun and help you make some side-income. Of course, one needs some writing skills. Moreover, if you are into food, you can have different kinds of content like restaurant reviews, cooking tips, etc. On top of that, recipe videos on YouTube are the talk of the town.
Starting a recipe blog is one of the better choices for anyone who is willing to consider blogging part-time and has some interest in foods.
So now, without much ado, let’s begin:
Step 1: Choose a Name and Register the Domain
I am sure you will have some names in mind. See if it is available or not.
I use Namecheap for all my domains. If you do not wish to register the domain with the registrar and pay an extra $15, you can get the domain for free with the hosting account. So as of now, check its availability with Namecheap.
So, whatever is in your mind for the blog, if it is something generic like “healthy recipes” or “fusion recipes,” try adding your name to them like “healthyrecipesbyYOURNAME.com.”
Or if you are trying to get your first name domain like shabbir.com, and if it isn’t available, try adding prefixes like “cook with” or suffixes like recipes to the domain name. More likely, they will be available.
If .com is not at all available, go for .me, .co, .com, or .net. Finally, you can also use your country’s domain extension like for India it is .in.
Once you have chosen the perfect domain name, you can either register it with Namecheap or get it for free from the hosts.
Step 2: Go With Shared but a Reliable Hosting
Speed is one of the critical factors in ranking websites in Google. Slow websites are losing ranking more than ever. The trend is expected to accelerate going forward.
A recipe/food blog is bound to be heavy with images. So one must consider having an optimal site speed that one can get with reliable hosting services only.
My recipe and food blog TastedRecipes.com is hosted at Siteground, and such an image-heavy homepage still can load in under 3 seconds.
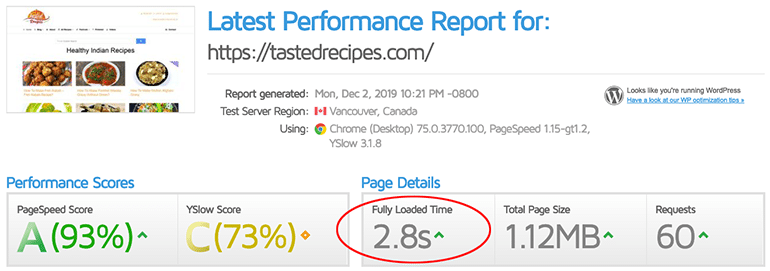
Still, please don’t take my words; here is what Syed Balkhi of WPBeginner, a guru in WordPress, has to say about Siteground.

Feel free to go for any host of your choice, but my suggestion will be to go with SiteGround.
SiteGround’s hosting is straightforward and easy to get started with. Moreover, in this guide, the screenshots I am sharing are from Siteground. It will help make the process simpler for you.
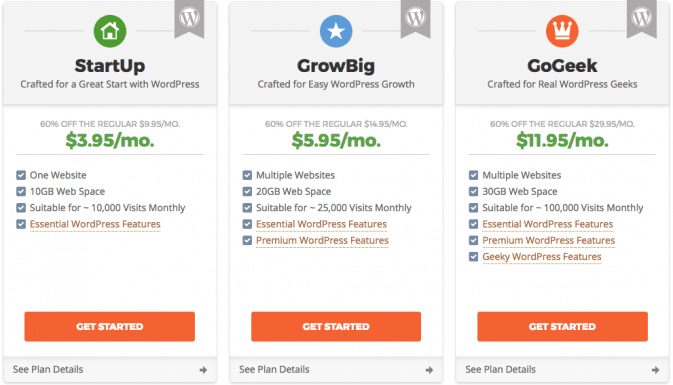
Select the plan that best suits you. The ideal choice to start with will be the GrowBig plan because it allows multiple domains and websites.
If you haven’t registered the domain at Namecheap, enter your domain name to register for free. If you already own a domain, you can keep using the same domain and point the DNS Servers to SiteGround.
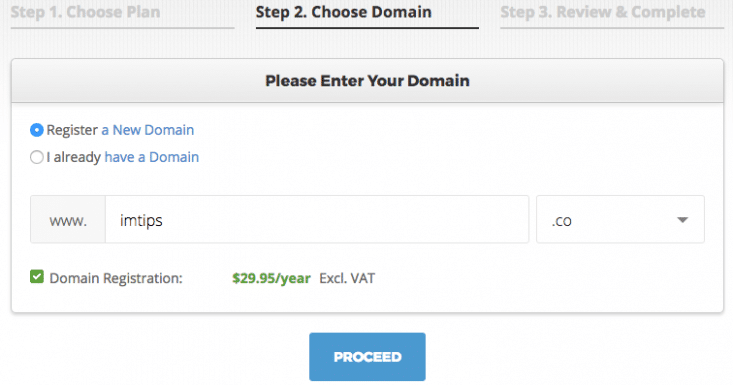
Note, even if you have registered a domain name in Namecheap, one can get a second domain name with Siteground and use both the domain names. Of course, one should redirect the secondary domain name to the one you prefer using. As an example, my domain name is TastedRecipes.com, but I also own TastedRecipe.com. The singular version. The only purpose of it is to redirect to the plural domain name.
Proceed to finish creating your Siteground account. Once your account is active, proceed to the next step to start setting up a recipe/food blog in WordPress.
Step 3: Set Up a WordPress Blog
WordPress is undoubtedly the best blogging platform currently available. It is far ahead of its peers and has been dominating the blogging world for decades. Yes, it has a learning curve for a beginner but is worth the effort. Easy to use, SEO friendly, social media integrated, customization by plugins, free themes to get started, premium themes, etc
Let’s use the automated installation provided by SiteGround to set up a WordPress and start a recipe or a food blog.
Visit cPanel inside the My Accounts tab.
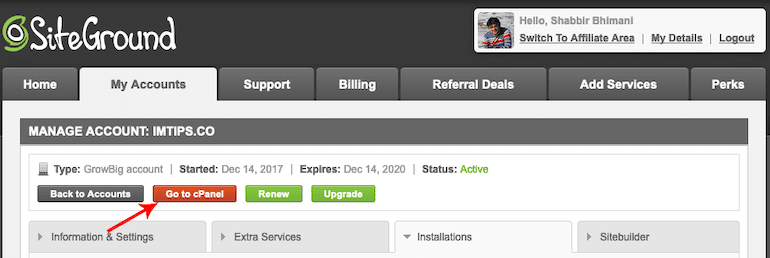
For WordPress, you are sure to find the “1-click-WordPress-installation” option in the hosting control panel. Search for WordPress in the control panel’s ‘quick find,’ and you will see an option to install WordPress.
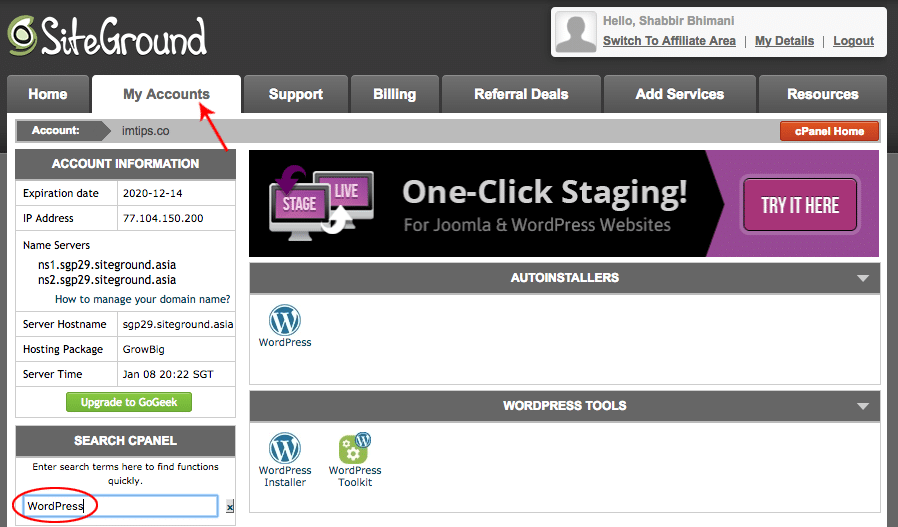
It will provide an option to select the domain where you wish to install WordPress. Once you choose the domain, you can specify a directory where you want to install WordPress. Leave the directory field as blank to install in the root of a domain.
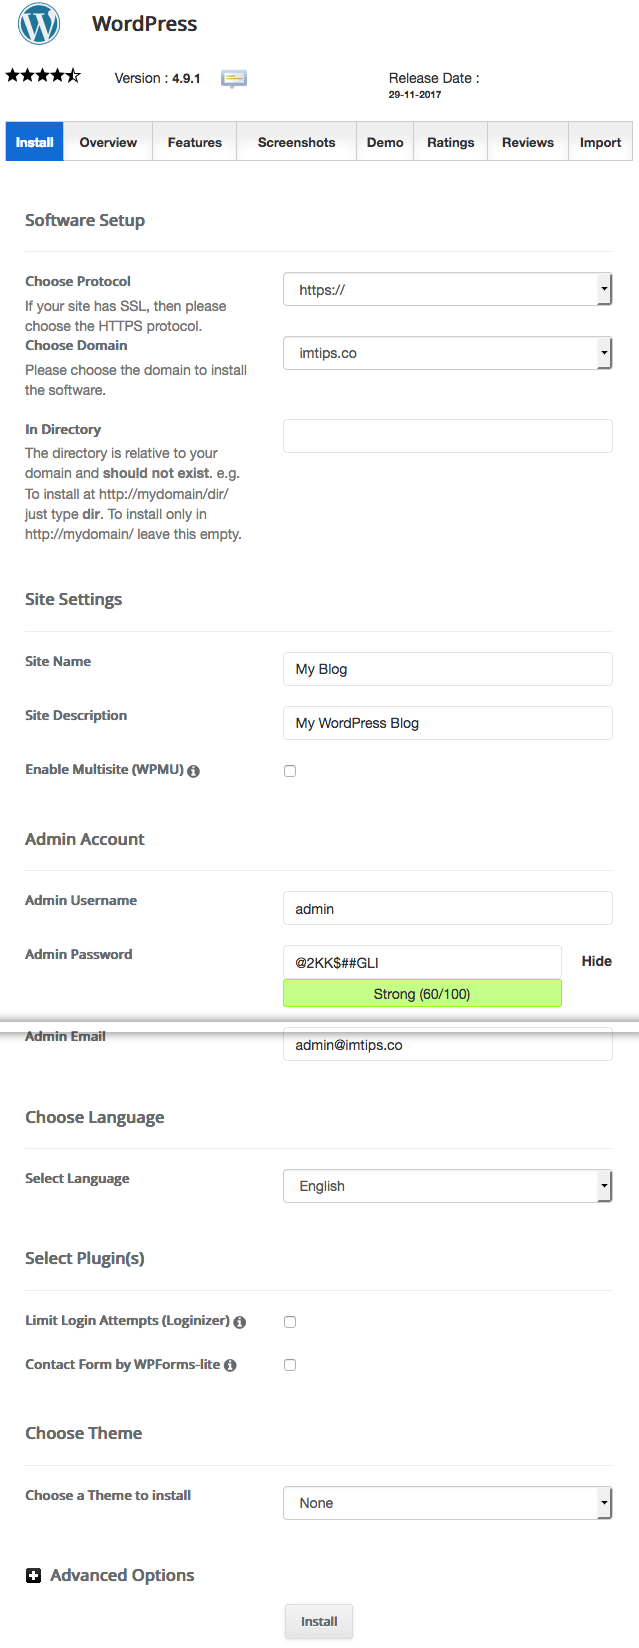
Click Install, and the WordPress installation will finish in a few minutes.
Note: Sometimes, the installation script may give a warning “Install directory exists and is not empty. Please confirm that it is safe to overwrite any content in this directory“. Don’t worry about it, as it’s just the default index file that may be triggering the warning, and it should be sufficient to overwrite.
Congratulations. Now you can access the admin area of WordPress by visiting yourdomain.com/wp-admin.
Suppose anyone visits yourdomain.com in a browser, the default Hello world! Post with the default WordPress theme will greet them.
Step 4: Select a Recipe/Food Theme for WordPress
Google and Pinterest treat recipes a lot differently. Google uses Rich snippet to show recipe details in the Google results.
See the screenshot below. Google not only picks up the recipe making time but also review count and star ratings.
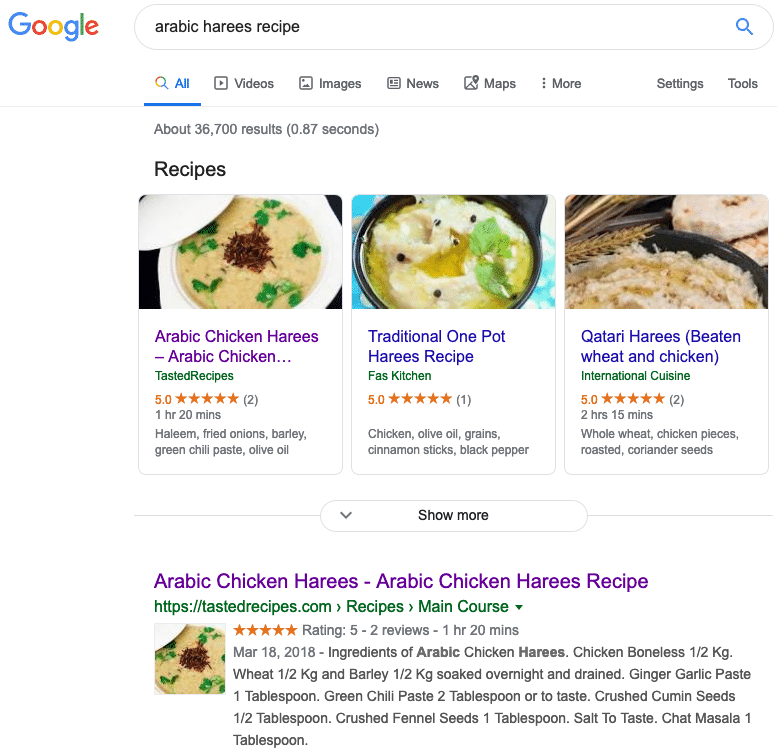
Having a theme that adds such information for Google can always help drive a lot more traffic to the recipe website.
Pinterest also pulls detailed recipe information like ingredients, making time, etc.
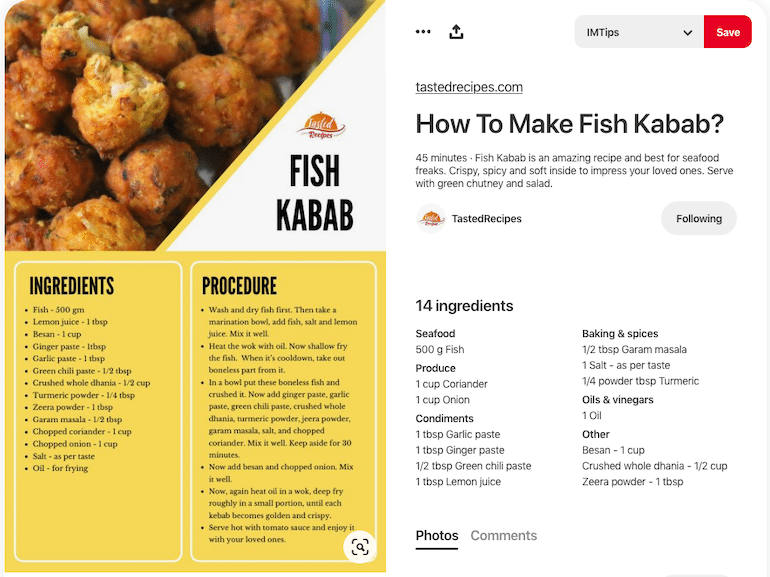
One has to choose a theme that has the support for recipe-rich snippets to use Google recipe search and Pinterest’s Recipe images.
Considering speed and Google search snippets, we decided to use the Neptune theme in ThemeForest for TastedRecipes. It has a separate post type for recipes and helps organize the recipes in cuisines, categories, and nutritional value.
Choose the perfect theme for the blog because the recipe items will be tied up with the theme. So make sure you select a theme that has everything you need. If you have confusion, feel free to use the one that we use.
Step 5: Install Google Tools
We need to add Google Analytics and connect the site to the Google search console.
Using your Google account, visit Google Analytics. If you don’t have a Google Analytics account, start by creating one.
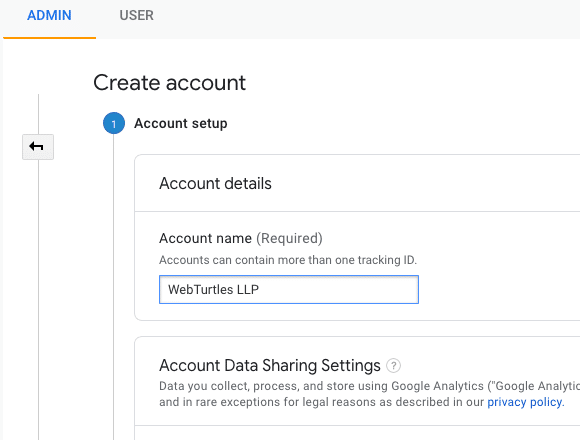
One can track websites as well as mobile apps in Google analytics. We will only select the web.
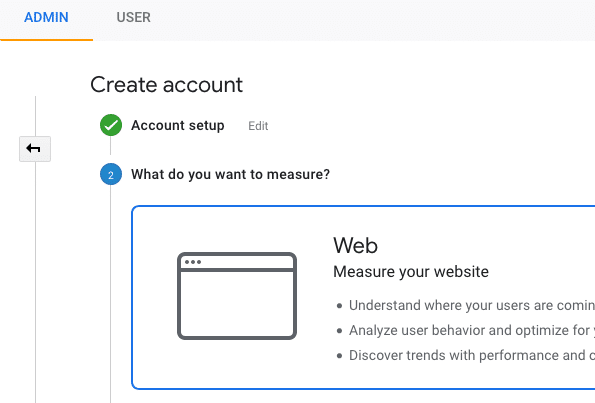
Now create the web property you want to be tracking in Google Analytics.
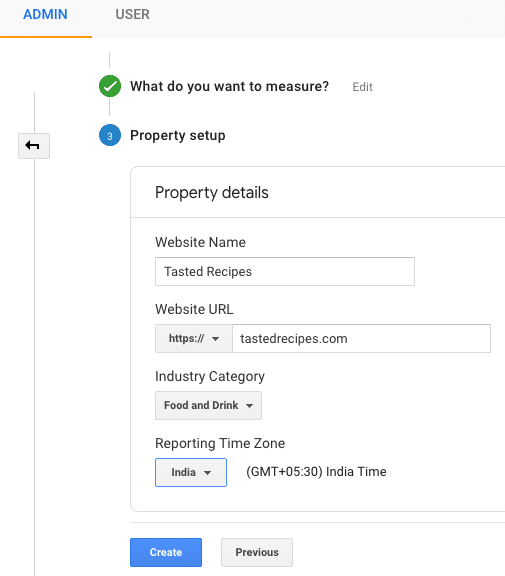
Once the property is created, Google Analytics will offer you a code to place within the site’s header area.
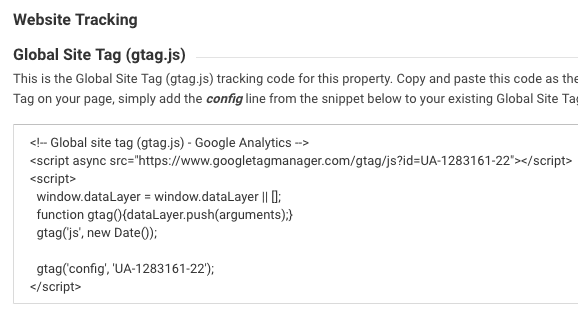
If your theme offers an option to insert the code, use the theme to do it. If not, you can install a plugin, Insert Headers and Footers and do the same. In the next section, we will see how to install a plugin to add extra features to the WordPress blog.
To connect a site to the search console, I have a complete guide here. Doing will help you identify any errors Google finds when indexing and crawling your recipe site.
Step 6: Install Needed WordPress Plugins
“Plugins” expand WordPress’s capabilities, adding more features and functions that aren’t part of the core WordPress.
Log into your WordPress dashboard and type in: http://yoursite.com/wp-admin (replace “yoursite” with your domain).
From the left menu, select Plugins > Add New.
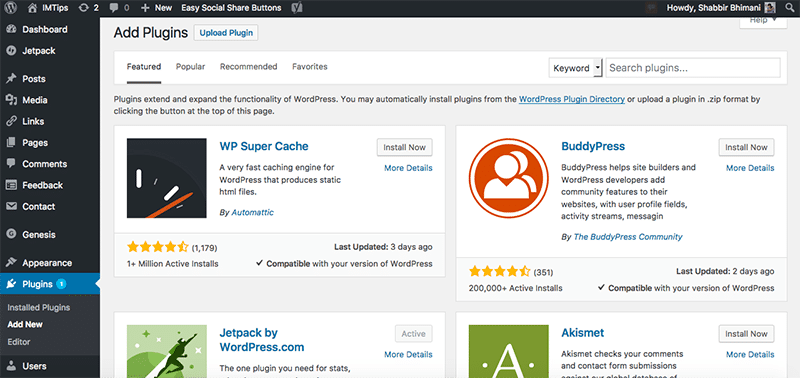
Search plugins and click the “Install Now” button to install the plugin. Once installed, click the “Activate” button to activate the plugin.
As an example, let’s install the contact form plugin. It is called Contact Form 7.
Search for “Contact Form 7” and click on the Install Now button. Once installed, the button will change to Activate. Click Activate.
It is all one needs to be doing to install a plugin in WordPress.
Once the plugin is installed and active, one can create an unlimited number of contact forms and embed them in WordPress pages or posts. In the WordPress admin Dashboard, left the menu, look for Contact > Contact Forms. The contact form will have a default contact form created for you and display a shortcode that one can place anywhere in WordPress and display the contact form.

There are more than 30,000 FREE plugins to choose from. Still, check out the Essential WordPress Plugins.
Step 7: Create Pages
Finally, we will publish a contact us page for the site.
Log into your WordPress dashboard and type in: http://yoursite.com/wp-admin (replace “yoursite” with your domain).
From the left menu, select Appearance > Pages > Add New.
Add the page title and page content, a mix of text, images, and videos. Once editing of content is complete, hit the ‘publish’ button.
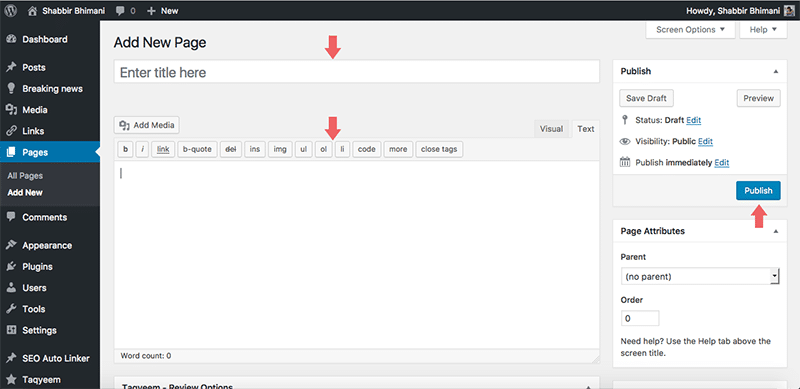
Put title as Contact Us, and in the content section, copy the code for the contact form you have from the plugin. Publish the page, and anyone can use the form to contact you.
Finally, Start Blogging
It’s time to start clicking pictures of recipes/food and start blogging. Over time, things will fall in place for you.
Don’t you think it is impressive that you have successfully started a fully-functional blog in WordPress?
It is not the end but a start in the world of opportunities with sites and WordPress. Apply my WordPress SEO Checklist and generate traffic to your blog.
Let me know the website you just launched, and if you have any questions, don’t hesitate to get in touch with me.
