The DIY guide with screenshots of every step and written for teacher or educators to help start an education blog in under an hour
Are you looking to start an education blog? Let me congratulate you. It is the right decision. I am sure my guide will be of immense help to you in launching your teaching blog. I am sure you will love this guide because:
- Written For Teachers – This guide has every detail and yet is easy to follow for non-technical teachers.
- A Step by Step Guide – A step by step guide is for those who wish to create their first education or teaching blog.
- You Can Ask For Help – I offer free help via email or even WhatsApp. I’m more than happy to answer all your questions and clear any doubts you may have.
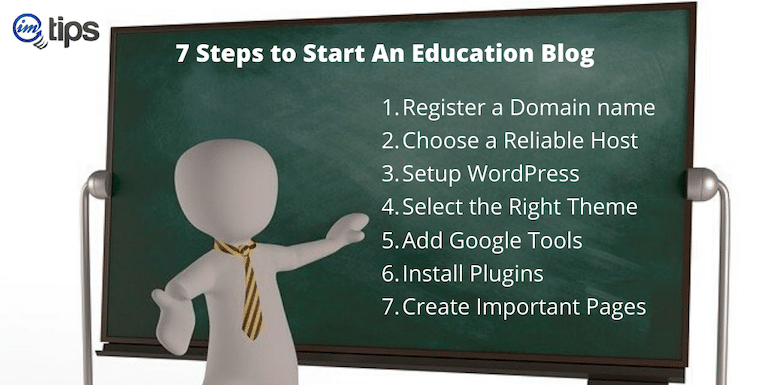
The process consists of seven steps.
Steps to Start An Education Blog
Here are the broad steps for the guide:
- Register a Domain name
- Choose a Reliable Host
- Setup WordPress
- Selecting the Right Theme / Design
- Install Google Analytics and Search Console
- Install Basic WordPress Plugins
- Create About / Contact Pages
Common FAQs for Education Blog
But before we start launching the blog, I will like to answer some of the common questions among teachers and educators about blogging.
What Is an Education Blog?
An education blog or edublog is a blog for educational purposes. It is typically created by teachers or experts to help students on a particular topic or niche. Education blogs mainly contain courses from instructors. Some can be free, and others can be paid as well.
Should I start an Education Blog or a YouTube Channel?
Why not both? There is no restriction on starting a YouTube channel when you have a blog or vice versa. Having a blog, as well as a YouTube channel, is recommended.
What are the Benefits of Blogging as a Teacher?
The benefits are endless. Here are some of the key benefits of blogging as a teacher, instructors.
- Share the Knowledge
- Build an Online Network
- Reach More Students
- Become an Authority
- Showcase Subject Expertise
How can teachers get paid for sharing free content on blogs?
There are many ways to earn through blogs. Some of the common ways to earn from a blog include:
- Ads.
- Donations
- Sponsorships
- Recommending products
- Selling Digital Courses
And check out my article on earning from the blog here.
Is WordPress Blog better Than Blogger by Google?
Yes. WordPress provides better control and way much more comfortable and better than Blogger by Google. No major blog apart from those owned by Google runs on Blogger. On the contrary, WordPress powers almost one-third of the Internet now. I mentioned one-third of the entire website online over the Internet and not one-third of all blogs online.
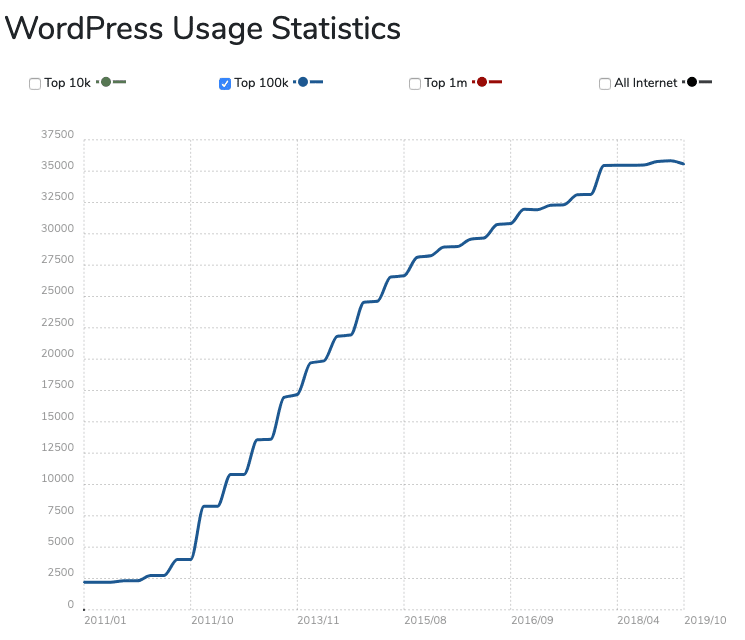
As per BuiltWith, 35% of the total top 100k websites are powered by WordPress, which is kind of insane.
Easy to use, SEO friendly, social media integrations, highly customizable with plugins, free designs, and themes, etc
Why I need a domain when I can start a blog for free?
One can set up a website on a subdomain like yourpreferredname.free-website.com, but it is never recommended to use a free sub-domain. Let me share why?
- Very Little to No Control
- Doesn’t look professional
- Missing Extra Features
- Limited monetization Option
If you have more questions about blogging, you can ask me here using the contact option.
Step 1: Choose a Name and Register the Domain
I am sure you will have a name in your mind. See if it is available or not.
I use Namecheap for all my domains. Note if you do not wish to register the domain with the registrar and pay an extra $15, you can get the domain for free with the hosting account as well. So as of now, just check its availability.
So, whatever is in your mind for the blog, if it is something generic on the topic you want to teach like “physics blog” or “maths blog,” try adding your name to them like “mathsbyYOURNAME.com.”
Or if you are trying to get your first name in the domain like shabbir.com and if it isn’t available, try adding your last name or even a prefix like “teacher” to the domain name. More likely, they will be available.
Moreover, if .com is not at all available, go for other general top-level domain extensions like .me, .co, .com, or .net. Moreover, you can also use your country-specific domain extension like for India, and it is .in.
Once you have chosen the perfect domain name, you can either register it with Namecheap or get it for free from the hosts.
Step 2: Choose a Reliable Hosting Partner
Hosting is like your car. The better car you have, the easier it will be for your journey, especially if you are driving. Similarly, if you choose a reliable host, it will make a lot of things easier for you.
As an example, speed is one of the critical factors for users to be on your blog. Many studies have revealed how slow websites make the user move away. No one likes to wait, and so will be the case with your blog readers.
As a blogger, I have tried many WordPress hosts. You name it, and I may have tried it.
As an example, I optimized BizTips for speed. Somehow, with my host, the site load time wasn’t getting under 3 seconds.
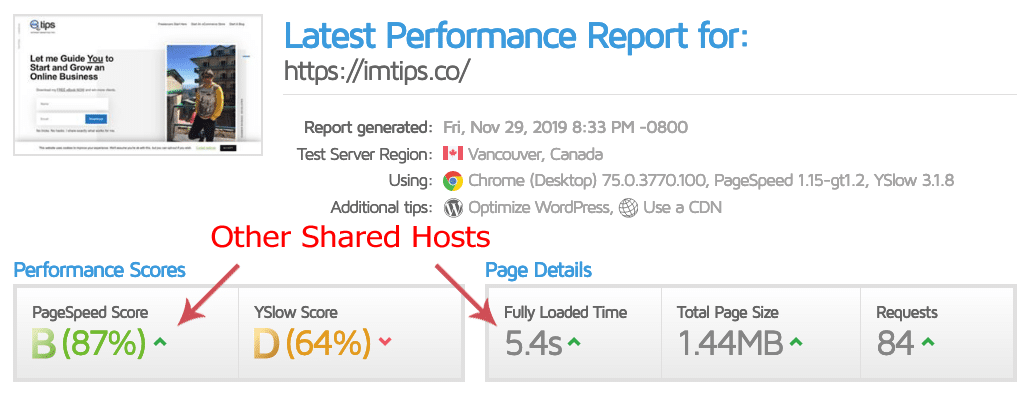
Over the weekend, when I moved the site over to Siteground and bingo.
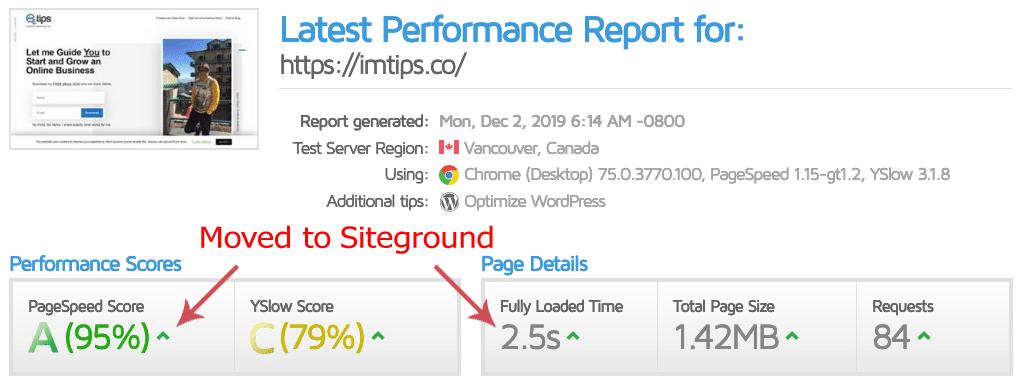
The same site with the same configuration now loads in under 3 seconds. Here is what Syed Balkhi of WPBeginner, who is an online guru, has to say for Siteground.
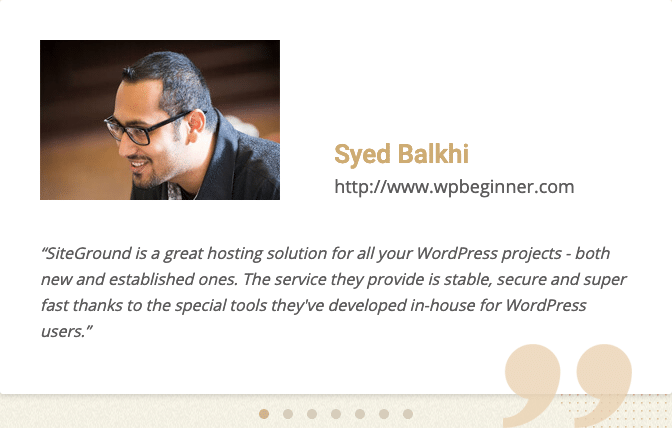
And there are many such testimonials from a top-notch expert for Siteground.
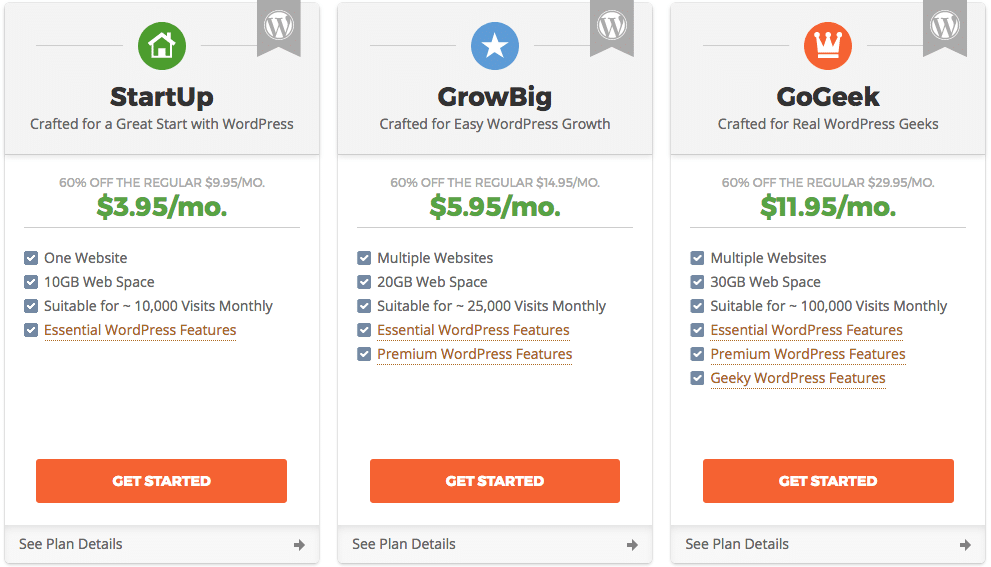
SiteGround offers multiple plans. Select the plan that best suits you. The ideal choice to start with will be the GrowBig plan because it allows multiple domains and websites.
If you haven’t registered the domain at Namecheap, enter your domain name to register for free. If you already own a domain, you can keep using the same domain and point the DNS Servers to SiteGround.
Here is my guide if you need help changing the domain’s Nameserver.
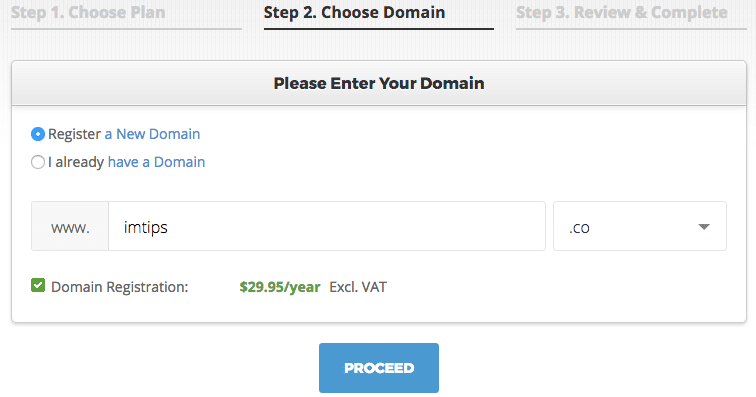
Note, even if you have registered a domain name in Namecheap, one can get a second domain name with Siteground as well.
Proceed to finish creating your new account with SiteGround. Once your account is active, let’s proceed to step 3 and start setting up the blog in WordPress.
Step 3: Set Up a WordPress Blog
As we have already seen, WordPress is undoubtedly the best blogging platform currently available.
So, let’s install WordPress. We will use the automated installation provided by SiteGround to set up a WordPress.
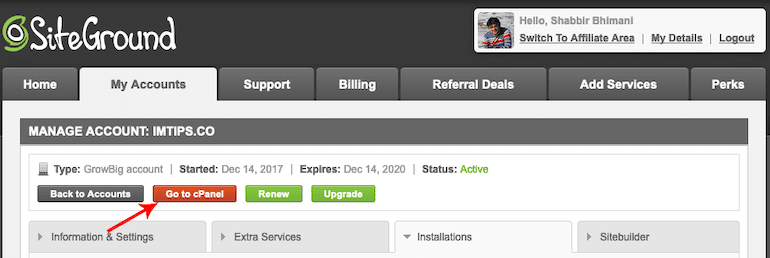
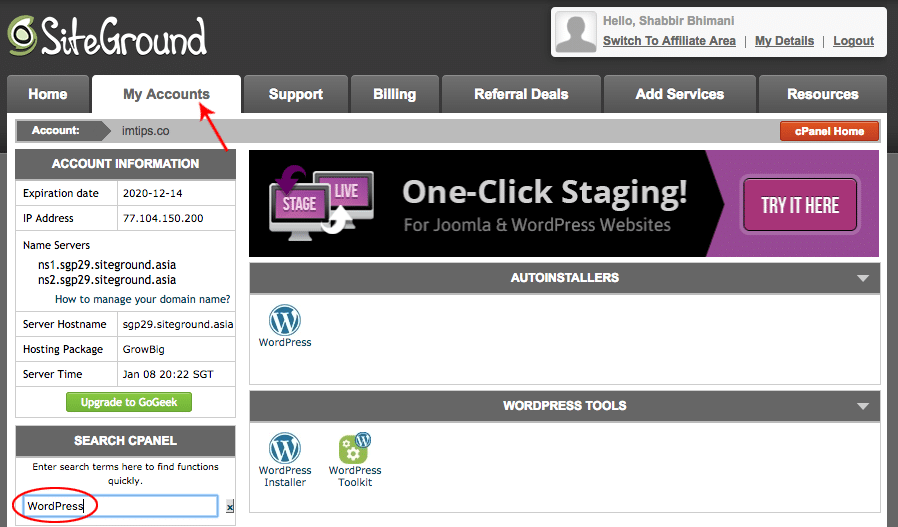
Login to the Siteground’s customer portal and click the control panel link inside the My Accounts tab.
Search for WordPress in the control panel’s “quick find,” and you will see an option for WordPress Installer.
Click the WordPress Installer. It will provide an option to select the domain name where you wish to install WordPress. One can specify a directory to install WordPress. Leave the directory field as blank to install in the root of a domain.
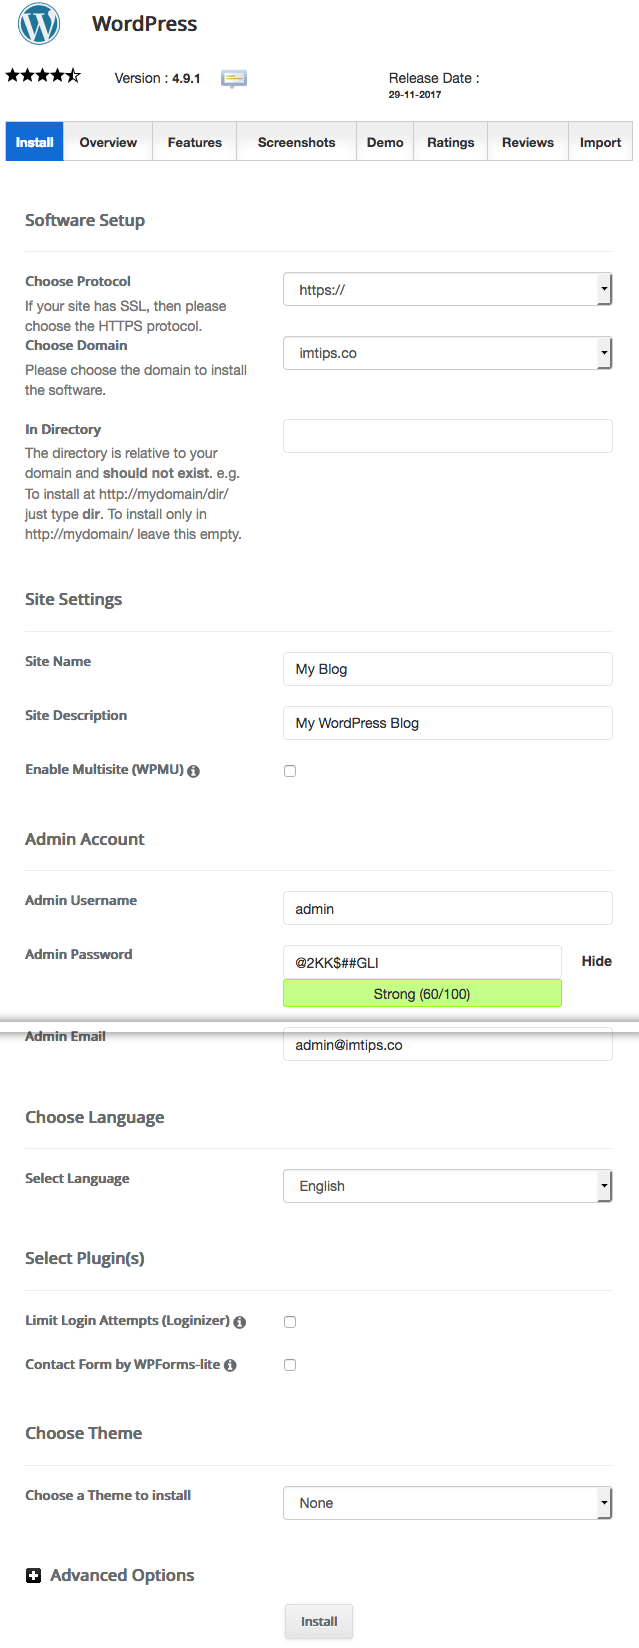
Click Install, and the WordPress installation will finish in a few minutes.
Congratulations. Now you can access the admin area of WordPress by visiting yourdomain.com/wp-admin
If anyone visits yourdomain.com in a browser, the default Hello world! Post with the default WordPress theme will greet them.
Step 4: Select Education Theme for WordPress
WordPress offers 6000+ readymade themes for blogs. Every theme is free to download from wordpress.org/themes. Moreover, you can choose Education themes from WordPress.org.
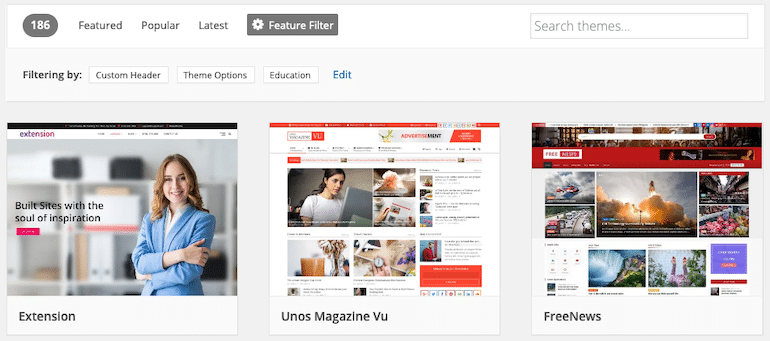
Spend some time to choose the perfect theme for your education blog. Make sure you select a theme that has everything you want.
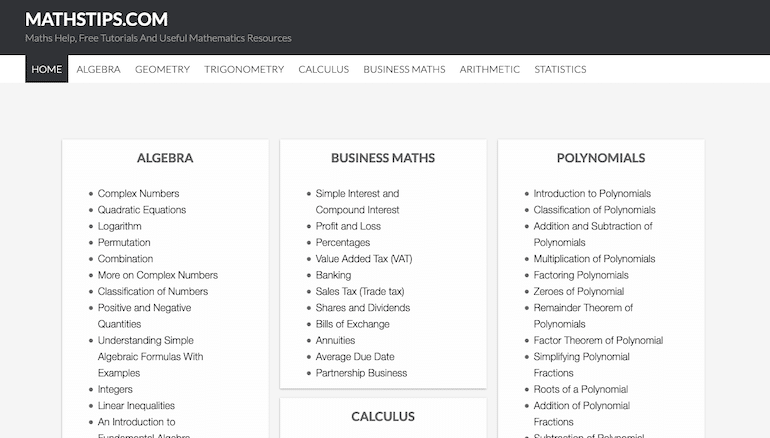
I use the Genesis theme on MathsTips.com, which isn’t free, but you can find a similar functionality theme on WordPress.org as well.
Step 5: Google Analytics and Search Console
Now we will add Google Analytics to your WordPress blog as well as connect the site to the Google search console.
- Google Analytics – There are 4 Ways to add Google Analytics to a WordPress blog, depending on the options available within the theme or using a plugin. I have shared all the four ways in detail steps in an article here.
- Google Search Console – Once you have added Google Analytics, verifying the website in Google search console can be automatic. Just follow the steps I have shared here.
Once your site is verified in Google search console, request site indexing by Google, moreover, the search console can report any errors on any URLs that Google may encounter when crawling or indexing the blog.
Step 6: Install Needed WordPress Plugins
“Plugins” extend WordPress’ with more capabilities. Installing a plugin is as simple as a couple of clicks, and WordPress will have the new ability as per the plugin. Let me share the details.
Log into your WordPress dashboard and type in: http://yoursite.com/wp-admin (replace “yoursite” with your domain).
From the left menu select Plugins > Add New
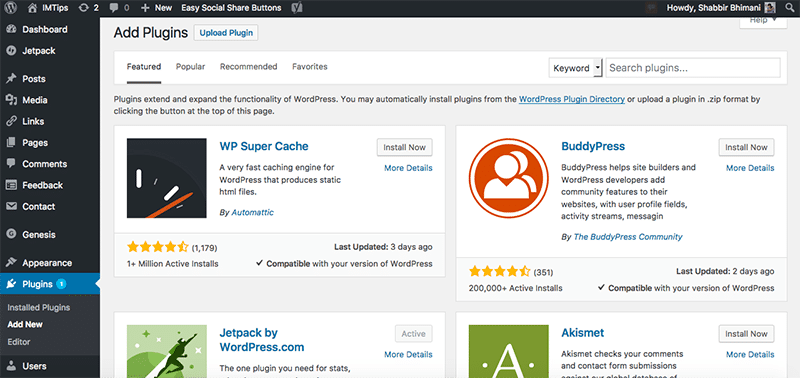
Search plugins and click the “Install Now” button to install the plugin. Once installed, click the “Activate” button to activate the plugin.
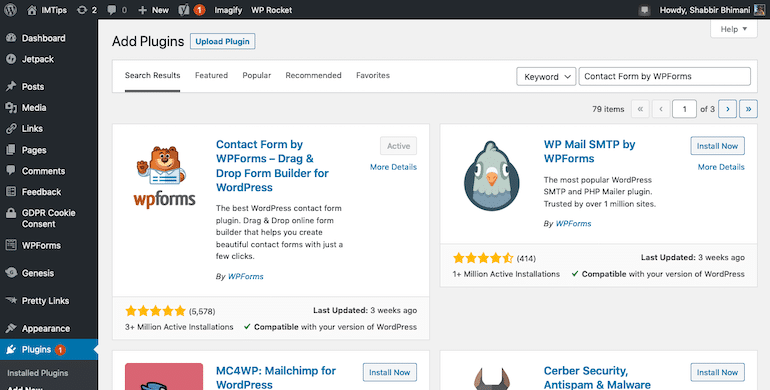
As an example, let’s install the contact form plugin. It is called Contact Form by WPForms.
Search for “Contact Form by WPForms” and click on the Install Now button. Once installed, the button will change to Activate. Click Activate. Once the plugin is active, it will show as in the screenshot below.
Once the plugin is installed and active, one can create an unlimited number of contact forms and embed them in any of WordPress pages or posts.
In the WordPress admin Dashboard left the menu, look for WPForms. Click Add New. There is a one-click option to create a simple contact form.

Select Simple Contact Form predefined template.
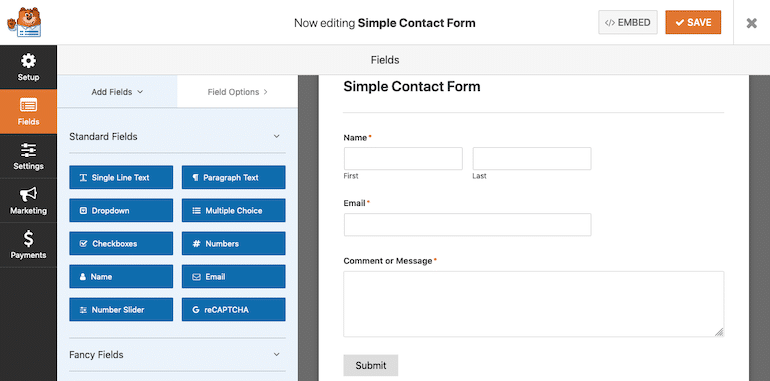
You can add fields, send emails to the different email addresses. So on and so forth. As of now, leave everything as default and click the Save button in the top right corner.
Once the form is created, it will provide a default shortcode that one can place anywhere in WordPress to display the contact form.

We will place the contact form on the contact page we will create in Step 7 now.
Step 7: Create Pages
Now, we will publish a contact us page for the site and use the contact form just created.
Log into your WordPress dashboard and type in: http://yoursite.com/wp-admin (replace “yoursite” with your domain).
From the left menu select Appearance > Pages > Add New
Add the page title and page content, which can be a mix of text, images, and videos. Once editing of content is complete, hit the ‘publish’ button.
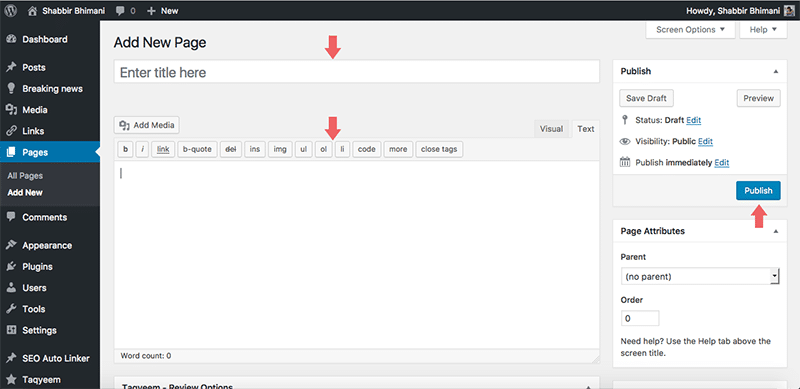
Put title as Contact, and in the content section, copy the code for the contact form you have from the plugin.
Publish the page, and anyone can use the WordPress page to visit and contact you.
Finally, Start Blogging
Don’t you think it is impressive that you have successfully started a fully-functional blog in WordPress in a very short span?
For a blog, the critical aspect is content. People will come to your blog if you have helpful content. So make sure you start writing helpful content.
Let me know the website you just launched, and if you have any questions, don’t hesitate to ask. WIll be more than happy to help in your journey as a blogger. I will be obliged to be part of your blogging journey.