A complete step by step guide with screenshots at each step to help you register as a seller on Amazon India and start selling online.
Amazon India has been helping all kinds of Indian manufacturers, and sellers get on board. Seller registration with Amazon India provides ease of doing business online and saves a large amount of money in terms of storage, delivery & distribution.
In short, any business can have a PAN India reach in a short time with Amazon.
The seller registration process at Amazon India might seem complicated in the first place, but actually, it isn’t. On the contrary, anyone can start selling on Amazon India in less than 24 hours.
If you are planning to sell on Amazon India, then this step-by-step guide is for you. Henceforth, let’s get along with the complete process of how to register on Amazon India as a seller.
There are few pre-requisite to start with Amazon. I will list them here, so once we begin the registration process, you have everything ready.
- Email address
- Company name
- GST number (Optional at the time of registration)
- PAN details of the company
- Bank account details along with IFSC code
- Mobile number for phone verification
Also Read: 9 Ways To Receive Payments for Indian Freelancers
The Amazon India Seller Registration Process
Amazon customer account where you register for making a purchase is different than registering for a seller account on Amazon India. For seller account registration visit this link https://sellercentral.amazon.in/. Click the Register Now button to begin the process.
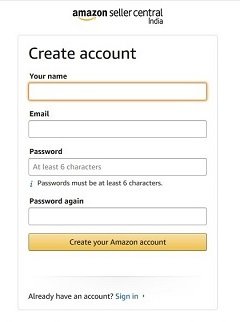
Add the required details like Name, Email, and a secure password of your choice to continue.
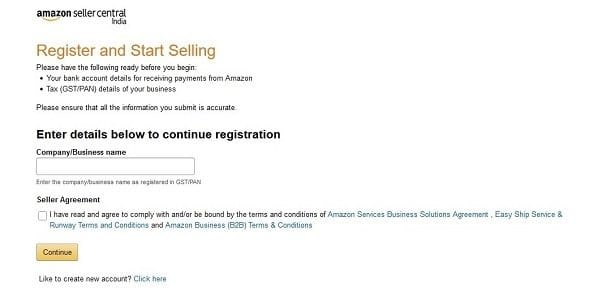
The next step in the process will require you to enter your company name. Add Company/Business Name, agree to the terms and conditions to continue.
If you don’t have a company or business name as yet, you can use your name and proceed. Use the same name as in the PAN card. In short, it is an entity that can receive payments.
Also, read 6 Websites for Indian Freelancers to Create Business Cards.
As you continue further, you will need to Verify Your Mobile Number. The process is pretty standard where you enter the number, get an SMS with an OTP to confirm the number and proceed.
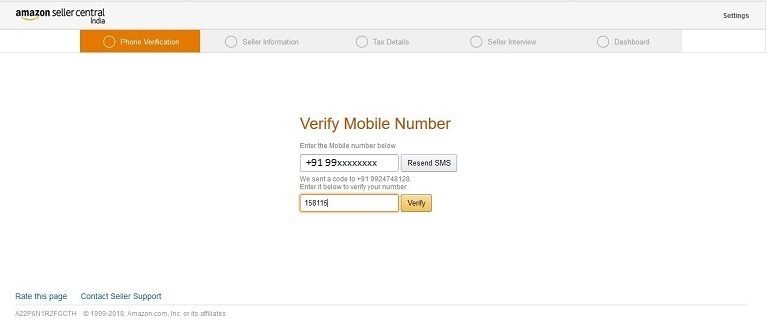
Verify the phone number to proceed to provide seller information where you will create an online store.
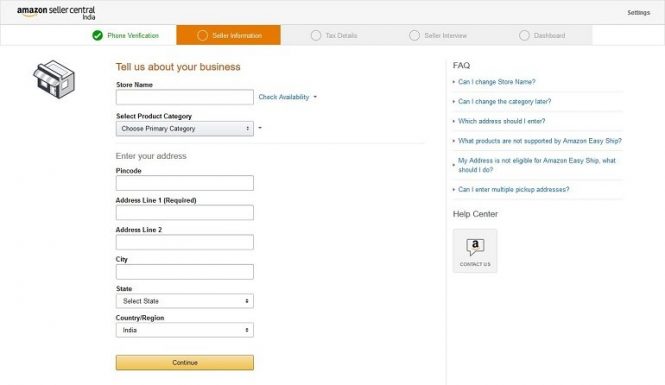
Store Name
Provide the store name as well as the physical address for the business. The store name can be the same as your business name. It is good practice to keep it the same. The store name has to be unique. If your choice of name isn’t available, you may have to edit till you get one.
Product Category
Within the seller information, it is essential to select the right product category for items you want to list for selling. Choose it wisely and the one that best describes your online store or the majority of the products you wish to sell at Amazon online.
Selecting the right category for your product is essential. To sell in a specific category, it will require prior approval from Amazon. You can check here the list of product categories that need approval for selling on Amazon.
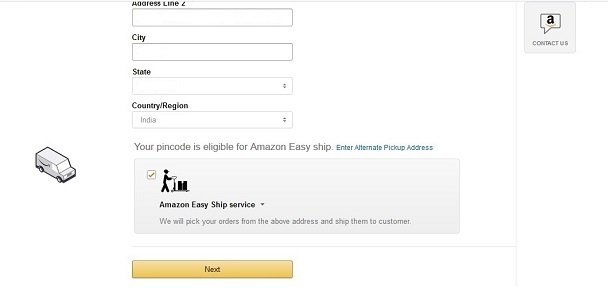
After physical business address details when you click continue, Amazon will ask you whether you want to enroll for Amazon’s easy ship program or not. You can opt-out of this program right now and enroll later on if you wish.
So before we continue further, let us understand what Amazon’s easy ship program is.
What is Amazon Easy Ship Program?
Amazon’s easy ship service helps you deliver your product to the buyer by picking up the order from the registered business address using its own logistics service.
This service is chargeable. So the seller has to pay an additional cost for pickup along with the marketplace commission to Amazon India.
If a seller doesn’t opt for the Amazon’s easy ship program, the delivery responsibility is of the seller. If a seller decides to ship the products, it is known as “Fulfilled by Merchant“.
There is one more option available which is “Fulfilled by Amazon (FBA)“. In the Amazon FBA program, the sellers send products to Amazon warehouses. Upon receiving an order, Amazon on behalf of the sellers’ packs and delivers the product to customers.
To put it differently, Amazon does all the heavy lifting of managing the stock and the inventory for you. The FBA option isn’t available at the time of registration.
The Registration Process (contd …)
Depending on how you want to ship your products, select the best option that suits your needs. If you aren’t sure, opt for the easy ship program as of now and click Next.
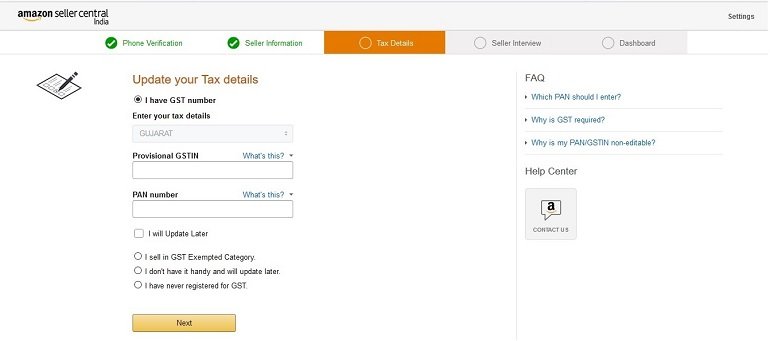
In the next step, provide GST & PAN number and choose the option that best suits your GST status. If you don’t wish to add your GST details right at this moment, opt for “I don’t have it handy and will update later” and click next.
Amazon allows a seller to start selling without a GST number. But you will need it sooner or later to withdraw money from your seller account to the bank account.
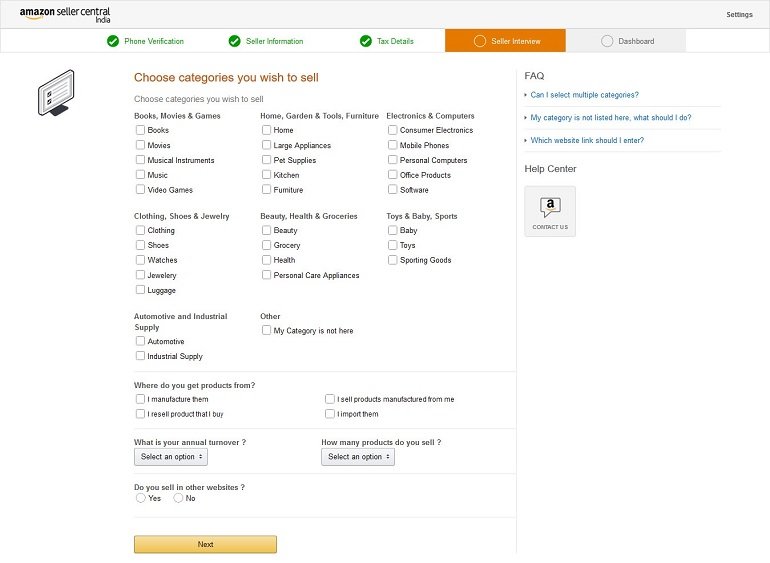
Next is the Amazon India’s pre-defined categories that you wish to sell. You can select multiple categories to sell a variety of products. Amazon also needs to know your source of products.
Amazon will do the verification of your source. Also, you need to enter your annual turnover and the tentative number of products you will list for selling.
Remember if you enter a very high turnover value just to impress Amazon, make sure you have a GST number as well. Turn over above 20 Lakhs requires a GST number.
The Registration Dashboard
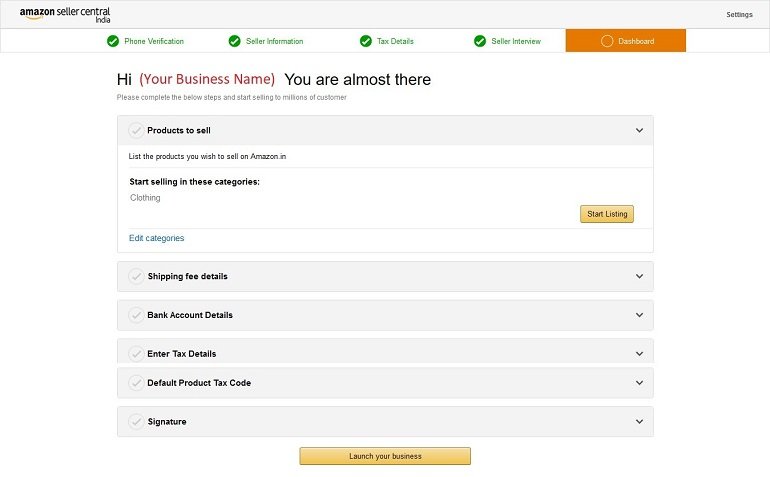
From the dashboard, you can start with listing products. Before that make sure you have the Shipping fee details, Bank Account Details, as well as the Tax details, uploaded.
Some Important Optional Steps You Shouldn’t Skip
The next option that seems logical is to “Launch your business“. If you skip the shipping fee details or signature, your account health will remain negative.
It means your seller rating will be lower and significantly impact your marketplace listing. As a result, you will get much fewer orders from customers.
- Shipping fee details allow you to set region-wise shipping costs on your products by creating multiple shipping templates. (Note: In the seller panel dashboard, you can edit shipping cost under the shipping settings option.)
- Update precise bank account details to withdraw money from the seller account.
- Enter GST and PAN details along with a product tax code as per the HSN Code.
- Scan your signature and upload an image for the printed invoice. The signature must be of an authorized person for the business.
Once you are finished with registration, the account status will change to “Being Verified By Amazon“. When all the details are verified, Amazon will notify you, and after that, you will be able to list and start selling.

