A Complete Step-By-Step Guide with Images to Help Sellers Create Self Ship Shipping Templates for their Amazon India Seller Account.
Amazon India Self Ship Service is a Merchant Fulfilled Network (MFN) where sellers do all the picking, packing & shipping of the products when they receive an order.
The transport used to deliver products in the Self Ship (MFN) service is a privately held third-party logistics or courier services.
What is a Shipping Template?
If you want to be delivering your products using your own courier, you have to go with self-ship service also known as fulfilled by the merchant or (MFN).
The shipping rates and other shipping details have to be provided by you (as a seller) for Amazon to be able to calculate the total cost of shipping for customer.
So the details of the shipping provided by you using a template that Amazon understand is known as a Shipping template.
As shipping is handled by the seller, the offers provided by Amazon for shipping may not apply. On top of that, self-shipping sellers are not eligible for prime delivery.
Only sellers shipping with FBA (Fulfilled By Amazon) Program are eligible for lot more shipping benefits.
The Importance of Assigning Shipping Templates to Products
The migrated template in every Amazon India seller account is the default shipping template. Amazon will assign it to every product in your seller account, whether a seller does or not. It’s by default.
A seller can always make changes in the default template as per his/her requirements. When a seller will receive an order the delivery charges (depending upon the location of a buyer) in the template will add to the product price.
Till here it seems legitimate.
The problem arises when the buyer orders more than one product or a combo of different products. The whole mechanism of the template is set to charge shipping fees depending on the regions one at a time.
It is not so very intelligent to calculate shipping fee for every single item in order on its own. Let’s understand this with an example.
Let’s say you sell Coffee Mugs with a Selling Price of Rs. 159 each.
When you receive an order of one single Coffee Mug, the system will charge the buyer with the selling price & the shipping fee.
Selling Price (Rs. 159) + Shipping Fee (Rs.80) = Rs. 239
But if the seller adds an additional coffee mug in the same order then the working will be as below.
Selling Price (Rs. 159 x 2 = Rs. 318) + Shipping Fee (Rs.80) = Rs. 398
Here the shipping fee remains the same for the whole order.
What does this mean? It means that you have configured the shipping fee on the whole order & not on the items in a single order. If you designate shipping fee item wise then the calculation would be as below.
Selling Price (Rs. 159 x 2 = Rs. 318) + Shipping Fee (Rs.80 x 2 = Rs. 160) = Rs. 478
Shipping Fee Configuration can be on:
- The whole order
- Every single item in the order
- A pack of 2, 3, 4, 5, 6, 7, 8, products
- Combo packs, jumbo packs & family packs
How to Edit Shipping Settings on the Seller Panel?
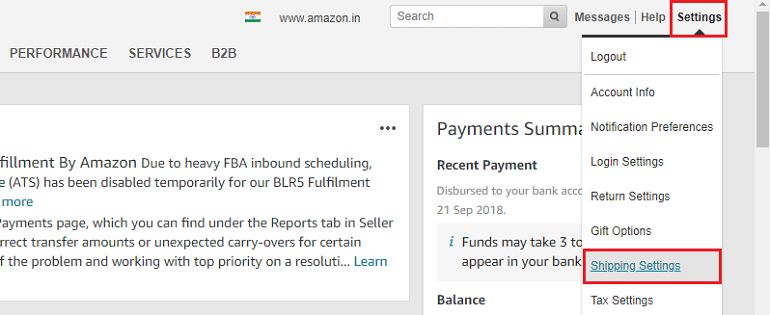
Log into your Amazon India seller account. (If you haven’t registered your Amazon India seller account yet then read here to register as a seller on Amazon India Step by Step)
Click “Shipping Settings” under the “Settings” option on the right-hand top corner. Now you are on the shipping settings page.
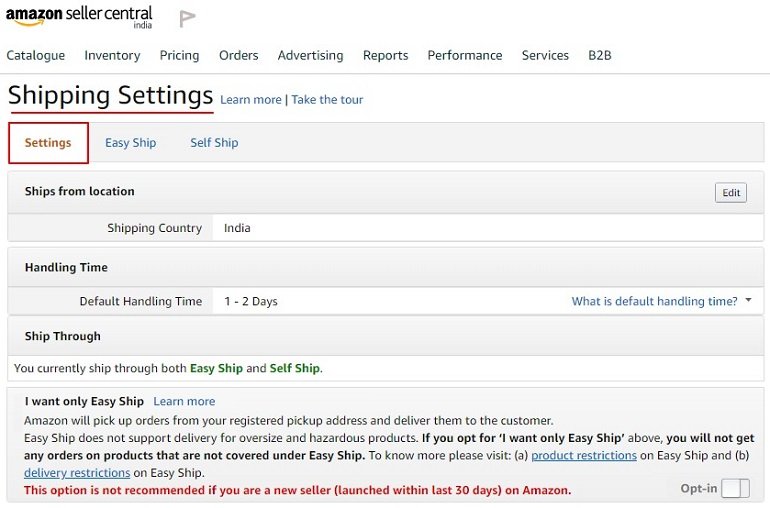
This widget helps you to make all kind of changes in existing shipping templates as well as lets you create the new ones.
- Ships from location – Definitely, it will be India here as we are located, registered & selling from India.
- Handling Time – This is the amount of time that a seller needs to pack & ship the order. It can vary from 1 t0 10 days depending upon the type & size of the product. The handling time field is present in the Product Detail Page.
- Ship Through – Newly registered sellers are enrolled in Amazon Easy ship & Self-ship Services. Later on, a seller can go with either of the options.
Undoubtedly Amazon Easy Ship is the fastest logistics service to deliver orders across India. It is important to realize that the pin code is serviceable by Amazon.
To know more about Amazon India Easy Ship read Understanding Amazon India Easy Ship Service in Layman Terms.
Create Self Ship Shipping Template on Amazon India?
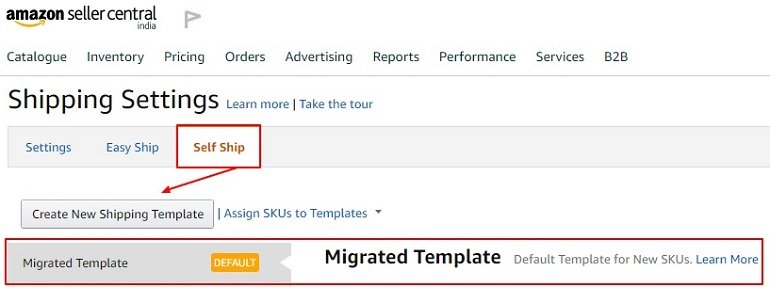
As shown in the above image click Self Ship option to configure new shipping template/s. The migrated Template is the default shipping template with pre-defined conditions which can be edited.
A seller can edit the migrated template & assign the same to all the product listings. Click “Create New Shipping Template” to open a separate dialogue box as shown in the image below.
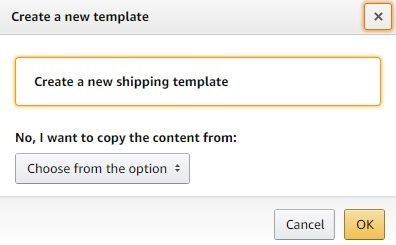
Name the shipping templates as per your requirements for easy identification. If you want to copy the settings of an existing template than select it from the drop-down list by clicking “Choose from the option“. Press OK and start defining the shipping fees region wise.
Read: How to Add A New Product on Amazon India – Step By Step Guide
How to Configure New Shipping Templates?
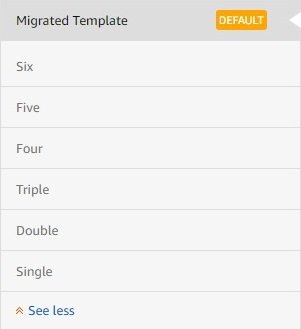
For understanding purpose, we have created six Custom Shipping Templates namely Single, Double, Triple, Four, Five & Six along with the default Migrated Template shown in the image below.
We will edit the “Single” shipping template.
A seller can facilitate its buyer with “Expedited (fast)” or “Standard” Delivery. The expedited delivery charges & timings are a little higher compared to the standard one.
One can say that expedited is a priority delivery option for buyers who want their products to be delivered ASAP. Click the “Edit” button.

Now we have the “Single” shipping template in the edit mode to make changes. Shipping fees can be configured based on the number of item/item weight and item price.
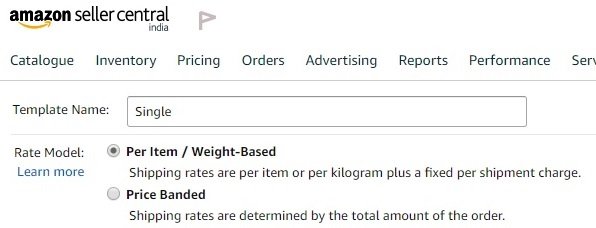
Per Item / Weight-Based Shipping
In the per item or weight-based shipping module, you set a flat per item or per item weight rate including the handling charges.
When you receive an order Amazon will charge the buyer for each item in that order based on per-weight or per-item shipping fees inserted in that template.
Price Bands
For price-banded shipping, sellers need to create price bands, such as INR 0 to INR 500, INR 501 to INR 1,000, INR 1,001 to INR 5,000 and so on. Each price band will have its own shipping rates.
When your buyer orders the product the system will review the total order value, then identify in which band the total order value falls so that it can apply the shipping rate specified for that price slab.
As shown in the image below a seller can edit regions, transit time, shipping fees and even delete the whole row.
For example, a seller doesn’t want to sell his/her products in a group of regions then simply deleting that region group will bare buyers from ordering the products.
Once you delete a particular region the products won’t be eligible for ordering.
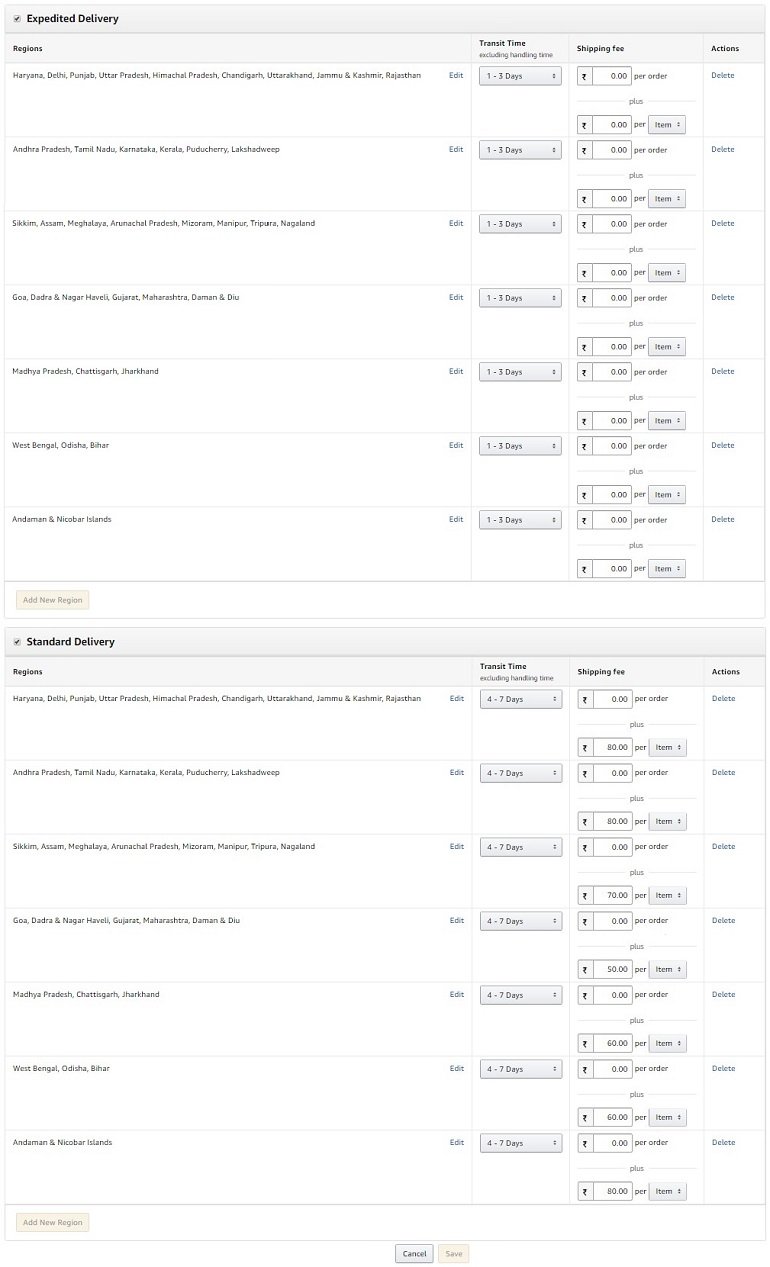
Click Save after editing all the values. Hence, using this widget a seller can create & assign custom shipping template to its products.
Read: How to Optimize Product Listing at Amazon India for More Sales?
How to Assign Custom Shipping Template to Products?
Go to the seller central & click Manage Inventory option under Inventory.

Click the Edit button of the product that you wish to assign a shipping template. This will take you to the new window called Edit Product Info.

On the Edit Product Info click the Offer tab and scroll down to the bottom.

At the bottom of the page locate Merchant Shipping Group Name and click on the drop-down list. You will see a list of all custom shipping templates that you have made along with the default one.
Select the template and click Save and Finish button. The template will be assigned to the product within 15 minutes.
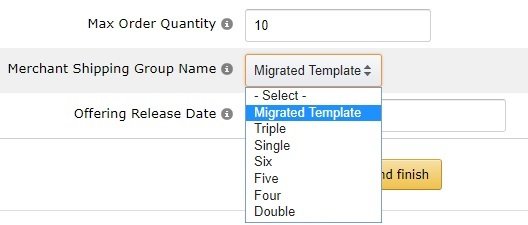
Once you assign the shipping template to your products you can go to the inventory page and check the same. The shipping template that is assigned can be seen under the “Price + Shipping” column below the price.
Refer to the image below.

Read: How to Create Manual Targeted Ad Campaigns on Amazon?
FAQs: Self Ship Shipping Settings
1. What benefits does self-ship shipping settings offer?
The self-ship shipping settings give the seller the flexibility to define the locations they can ship to, the shipping time and add distinct shipping rates based on these factors.
All these settings can be done in the self-ship shipping templates. Sellers can then assign custom created templates to an individual or a group of products.
Moreover, sellers can charge their buyers based on per Item, weight-based or price bands.
Additionally, sellers can add new regions where their courier partners can deliver orders and can remove existing locations if the courier partner doesn’t deliver to that location.
This way a seller can charge his/her buyer with a product shipping fee based on the rates charged by the courier partners.
2. Will my self-ship shipping templates override the easy ship option.
No, self-ship and easy ship both are different. If you receive an order from a location where Amazon India doesn’t deliver then your order panel will show self-ship option.
Orders received from the location/pin code serviceable by Amazon India will show easy ship option by default.
3. How many self-ship shipping templates a seller can create?
A seller can create a maximum of 20 shipping template in the self-ship settings. Attempting to create more than 20 will show an error.
4. How many self-ship shipping templates a seller can assign to a single product?
One single product can have only one shipping template assigned. If a seller attempts to add more than one shipping template than it will show an error.
