Are you looking to start a blog in 2020? Here’s why you’ll love my free guide:
- For Non-Technical People – This guide is easy with details that are easy to follow – even for a non-techy person.
- A Step by Step Guide – This guide is for those you who wish to create their first blog and want to keep the guide the side to refer each step.
- You Can Ask For Help – I offer free help via email or WhatsApp. I’m more than happy to answer all your questions and clear any doubts you may have.
We will complete the process of setting up your blog in three simple steps. Moreover, I have added answers to a common question I can think of, or my blog readers have asked in the past.
But before we begin, let me share seven reasons why I think everyone should start a blog.
7 Reasons to Start a Blog
There are many reasons why people start a blog. Let me share seven reasons to blog.
- Express or Add Value – As a subject matter expertise, can you add value to the reader on the subject matter—Science, religion, or anything else.
- Hate Job or 9 to 5 Schedule – Do you think your boss is an idiot, and you can do things a lot better. People plan to start a blog along with the job and to take up blogging as a full-time profession to quit the job.
- Follow the Footstep of Another Blogger – As people read about bloggers, they start a blog because they find the person whom they are following has been doing great as a blogger.
- Establish Expertise – Blogs can help professionals establish themselves as an expert. Blogging can help build expertise and expand online presence.
- Want to be Creative – Blog can be a great place to show off. Graphic designers or writers can use the blog to share artwork or stories.
- Promotion or Marketing – Blogs are excellent tools for promoting the product. Some blogs exist to educate potential customers about the use of certain products and, in the process, make sales for their product.
- Make An Extra Income – Finally, people start a blog to make an extra income online. However, blogging solely to make money online is one of the most common reasons why blogs fail.
Now, let us get started with the steps to starting a blog.
Steps to Start A Blog
Here are the three broad steps for the guide:
- Find The Right Domain Name and Hosting for Blog
- Setup WordPress to Start Blogging
- Customizing a WordPress Blog as a Non-techy
Step 1: Domain and Host for the Blog
To get a new website online, we need a couple of things:
- A domain name – A website address like yourpreferredname.com, which is registered in your name and is unique to you.
- Host – A service to connect your domain name accessible over the Internet via a browser. When anyone types the domain name in a browser, it will show the desired content.
Why I need a domain when I can start a blog for free in WordPress.com?
One can set up a website on a subdomain like yourpreferredname.free-website.com, but it is never recommended to use a free sub-domain.
Let me share why.
1. Very Little to No Control
Using a subdomain is like creating a blog with minimal to no control over it. The provider will have restrictions (Like a WordPress.com subdomain blog can’t have JavaScript code in the sidebar. Neither can modify an existing theme nor use a custom theme).
Buying a domain and hosting doesn’t cost much. I can’t find a single good reason why anybody should consider hosting a blog or portfolio website on a subdomain. It’s as if houses are available cheap, but someone still prefers living in a rented space with all sorts of restrictions.
2. Doesn’t look professional
‘YourPreferredName.com’ looks more professional than ‘YourPreferredName.free-website.com’.
For a moment, act as a customer and consider what you will prefer? yourpreferredname.com or yourpreferredname.free-website.com. As a customer, if you don’t favor a subdomain, why should your clients and customer will?
3. Missing Extra Features
When you own a domain name, you can create your email addresses, such as @yourpreferredname.com, which you can’t on a free subdomain.
Apart from being able to create your email addresses, you have control over the site – Can opt for better hosts, provide better user experience, and can upload a custom design.
4. Limited monetization Option
As and when you want to monetize a blog, the limitation of the provider of the sub-domain will weigh heavily.
As an example, if you are using a WordPress.com subdomain, you won’t be able to monetize it via AdSense and can only use WordAds a feature by WordPress for monetization.
How to choose the right domain name for starting a blog?
I have a straight forward formula for selecting the perfect domain name.
- If you’re forming a team and want to be forming a company, your domain name should match your company name. Take, for example, ‘CompanyName.com’. But if ‘.com’ isn’t available, opt for ‘CompanyName.net’ or ‘CompanyName.co’.
- If you’re planning to go solo, have a personal blog, and use ‘YourName.com’.
My preferred domain extensions are .me, .co, .com, .net and .in. And I generally tend to avoid longer domain extensions like ‘.net.in’ or ‘.co.in’.
For domain names, I use Namecheap, but if you don’t have a hosting account yet, you can get the domain name for free with Siteground’s hosting.
Coming up with the right name can be a bit tough since there are millions of active domain names in the world right now. But don’t give up. Keep digging till you have found that perfect domain name.
I have chosen ‘BizTips.co’ as my blog’s domain name because I liked the short names. It’s my blog, so I also have a domain for my full name shabbirbhimani.com that redirects to BizTips.co.
How to find a reliable host for a blog?
A right host will help you grow your blog much faster in Google because site speed is a critical factor in Google ranking now. It is going to increase in 2020 and beyond.
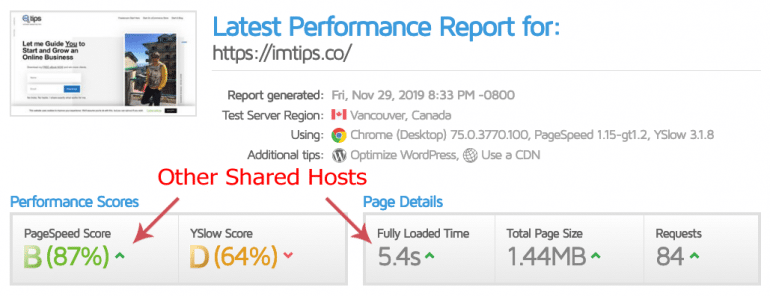
As a blogger, I have tried every possible WordPress hosting. You name it, and I may have tried it. So many bloggers recommend BlueHost, but I found their services to be slightly subdued on many occasions.
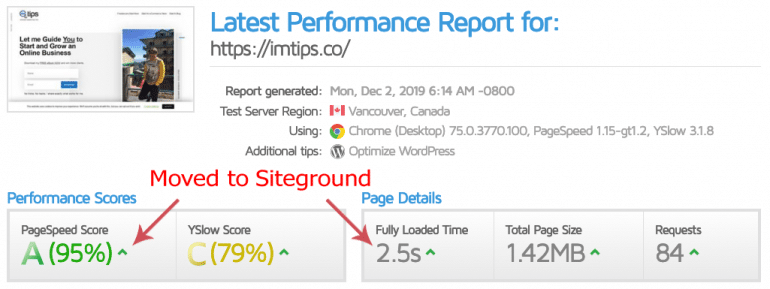
I have optimized my site for better speed for sure, but somehow, the site loading wasn’t getting under 3 seconds, which is a requirement in Google.
Over the weekend, when I moved the site over to Siteground and bingo.
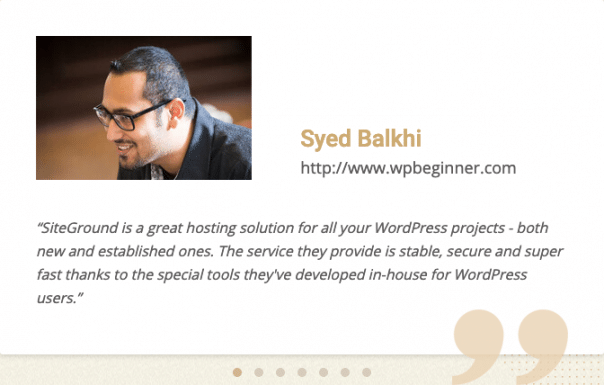
Still, don’t take my words for Siteground, and here is what Syed Balkhi of WPBeginner has to say about Siteground.
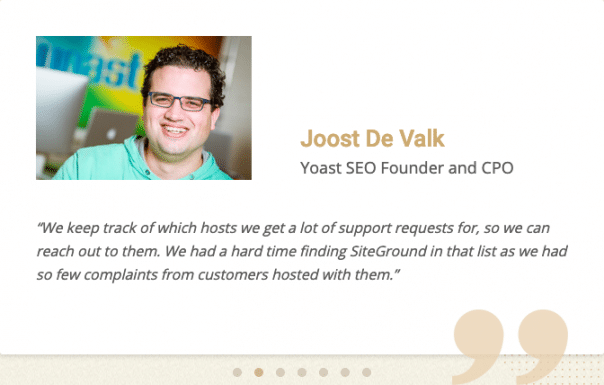
Or Joost De Valk of Yoast SEO
SiteGround’s hosting is straightforward and easy to get started with. I will share screenshots with details of every step to help make the process simpler for you.
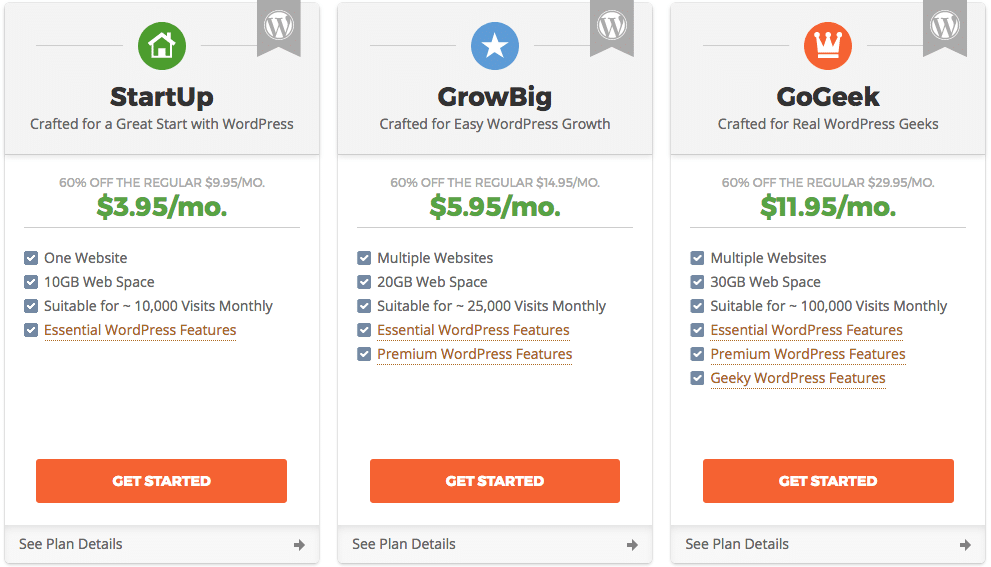
SiteGround offers multiple plans. Select the plan that best suits you. The ideal choice to start with will be the GrowBig plan because it allows multiple domains and websites.
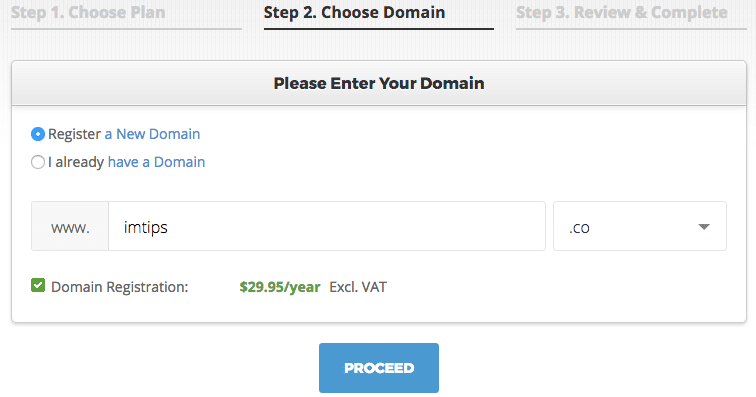
If you don’t have a domain yet, enter your preferred choice of name to register. If you already own a domain, you can keep using the same domain and point the DNS Servers to SiteGround.
Proceed to finish creating your new account. Once your account is active, let’s proceed to step 2 and start setting up the blog in WordPress.
Note: You have an option to make payment via a credit card in USD. But, if you prefer using a PayPal account that accepts INR, you have to get in touch with the support.
Step 2: Set Up Your WordPress Blog and Start Blogging
We will now start setting up WordPress, but before it, I am sure you may have the uber-important question of why WordPress.
Why WordPress?
WordPress is uber-popular and is way above its competition. WordPress powers more than half of the total websites on the Internet. Yes, you read it right – half of the overall sites on the Internet.
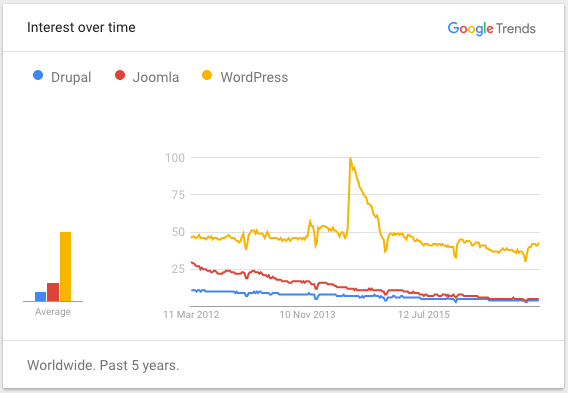
Apart from being famous, it is
- Free – WordPress is free to download, install, use, redistribute, and modify as per the need.
- Easy – WordPress is easy to use (as we will see in step 3) and manage. Even a nontechnical person can easily manage WordPress.
- Simple to Learn – WordPress has vast documentation, a helpful community, and tutorials to make learning very simple and easy.
- Safe and Secure – WordPress is a very popular CMS. So, it’s a target for hackers as well. However, WordPress takes the security of its users very seriously and continually updates to safeguard users from attacks.
- Adaptable to Different Types of Sites – WordPress has evolved from being a blog platform to a complete content management system. It can manage and create different types of websites like an eCommerce website or a membership site, etc.
- Extendable with Themes and Plugins – There is a WordPress theme for about every kind of site. Moreover, there is a WordPress plugin for just about every type of functionality one can ever imagine.
- Responsive – WordPress themes are mobile-friendly, tablet-friendly, and can adapt to any device.
- Search Engine Friendly – WordPress out of the box is SEO friendly. Yet one can make it, even more SEO friendly by using various SEO plugins.
- Social Media Friendly – WordPress has all the needed features to make it easy for users to share content on social media.
There aren’t any better alternative ways to start a blog than WordPress.
Blogger Vs. WordPress – Which is Better?
Though Blogger is by Google, still it isn’t as good as WordPress.
Google purchased Blogger known as Blogspot, then in 2003, and offers it for free. One can use Blogger with a Google account to host a blog and tie it up to a custom domain as well. But Blogger by Google comes with quite a few disadvantages as compared to WordPress
- No Control – Even if Blogger can be used for a domain and server, you aren’t in the total control of the back-end software. Google owns everything, and the day they decide to stop, you are left with no choice. Don’t forget Google killed its popular services like Google Reader or FeedBurner.
- No Active Community – After being acquired by Google, the Blogger community hasn’t been as active. So there aren’t many useful plugins available to customize a Blogger blog.
- Limited Choice of Design – There isn’t any choice of themes to make Blogger blog not look like a typical blog. It always seems like a listing of articles in reverse chronological order.
- Comments – Comments are mainly handled by Blogger (aka Google), and you have very little control over them.
- Permalinks – No control over the site links structure. You can have post’s URLs without a year and month parameter in it.
- Blogger by Google isn’t a CMS – Blogger can only be used as a blog and not as a CMS or a portfolio website. Whereas WordPress can be used as a complete website. So Blogger isn’t used as an entire content management system like WordPress.
- Doubtful Future of Blogger – Blogger hasn’t seen any significant updates by Google for a very long time despite being overdue. It seems the software is dying the natural death, and Google is allowing it as well. No primary blog apart from Google’s product blog are on it because of its limited use.
WordPress is undoubtedly the best blogging and website building platform. Yes, it has a learning curve to travel for a beginner, but it is worth the effort. Easy to use, SEO friendly, social media integrated, customization by plugins, free themes to get started, premium themes …
How to Setup WordPress?
First to creating a blog in WordPress is to install it. Ideally, one should be using the automated installation provided by SiteGround, but one an also do a manual installation. I won’t get into the technical aspect of manual WP installation here.
1. Automatic Installation
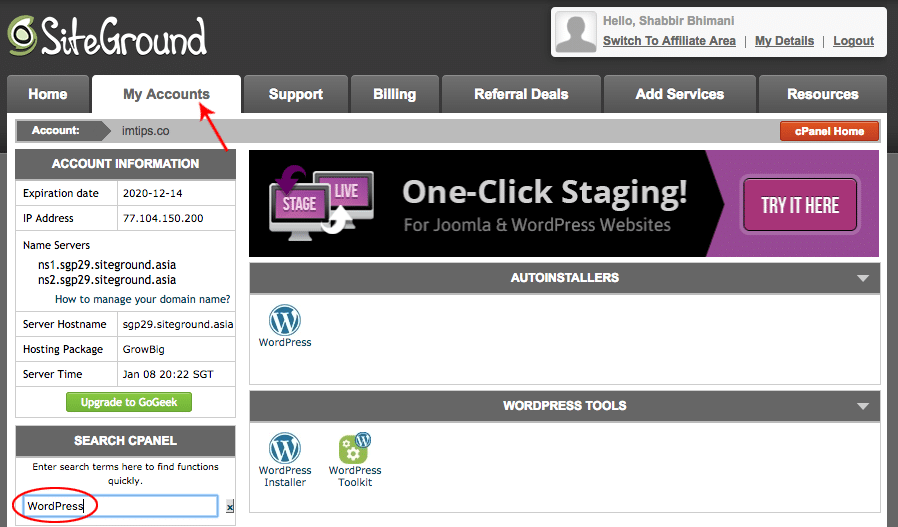
Visit cPanel inside the My Accounts tab.
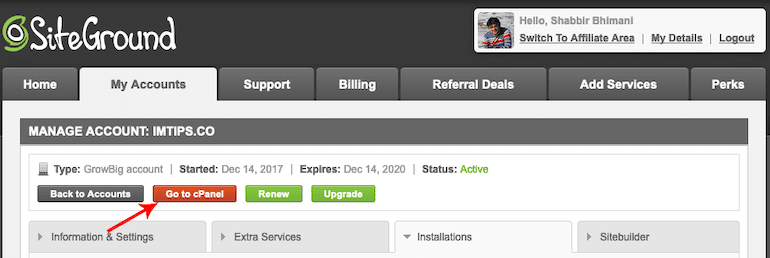
For WordPress, you are sure to find the “1-click-WordPress-installation” option in the hosting control panel. Search for WordPress in the control panel’s ‘quick find,’ and you will see an option to install WordPress.
It will provide an option to select the domain where you wish to install WordPress. Once you choose the domain, you can specify a directory where you want to install WordPress. Leave the directory field as blank to install in the root of a domain.
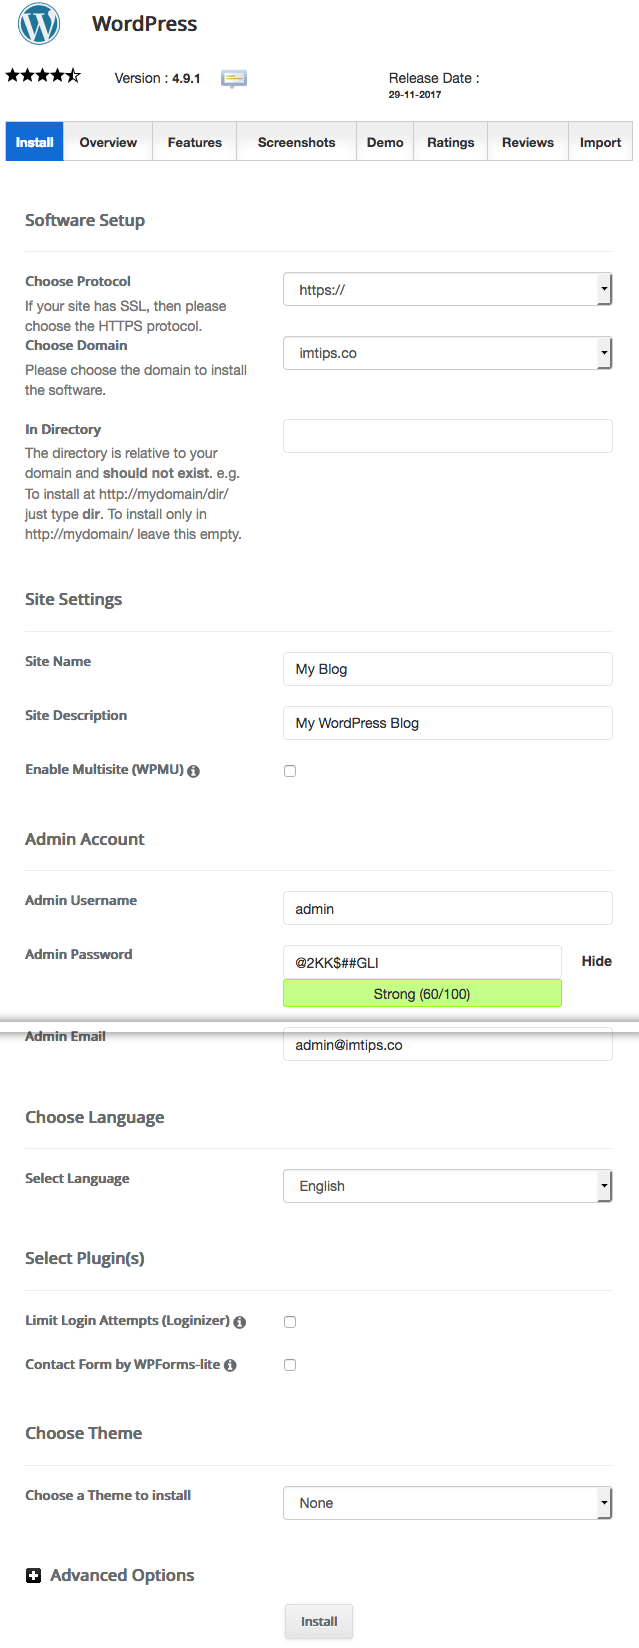
Click Install, and the WordPress installation will finish in a few minutes.
Note: Sometimes, the installation script may give a warning. “Install directory exists and is not empty. Please confirm that it is safe to overwrite any content in this directory”. Don’t worry about it, as it’s just the default index file that may be triggering the warning, and it should be fine to overwrite.
Step 3: Customizing WordPress
Congratulations on getting the WordPress up and running. If one visits yourdomain.com in a browser, the default Hello world post with the default WordPress theme will greet them. But you don’t want to keep your blog look like a default WordPress site. So you need a different theme – a design template that tells WordPress how your blog should look.
How to get a Custom Design for a WordPress blog?
The next step is to get the perfect look for the blog. The design of a WordPress blog is a cakewalk with ready-made themes. We don’t need to code each HTML or PSD anymore manually. Get a theme that suits your design needs and then drag-drop elements in the theme as per the options in the theme. A theme is a ready-to-use, already designed template. The theme tells WordPress how your blog will look on the world wide web.
WordPress itself offers 6000+ readymade themes for blogs, eCommerce websites, individual and corporate websites, portfolio websites, and more.
Every theme is free to download from wordpress.org/themes. Search for a theme that suits you. Next, move to theme installation.
If you didn’t find the perfect free theme, you could also go for premium themes. Free themes are a good starting point. Once you are familiar with the themes, then you can go for premium themes. I use the Genesis child theme for all my blogs.
How to Install a Theme in WordPress?
Log into your WordPress dashboard and type in: ‘http://yoursite.com/wp-admin’ (replace “yoursite” with your domain).
From the left menu select Appearance > Themes
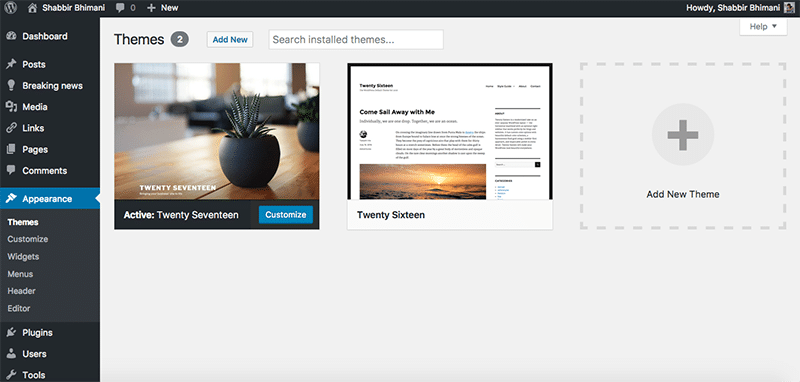
Click the “Add New” button to bring up the WordPress themes interface that offers you the ability to search, preview, and install any WordPress theme of your choice. Installing a theme is as simple as clicking the “Install” button. Once it’s installed, click the “Activate” button to activate the theme.
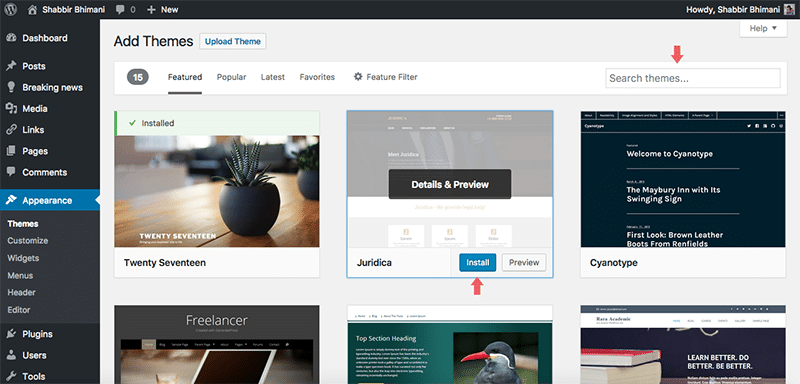
I suggest you spend some time browsing free themes and find the one that perfectly suits your design buds. Finding the perfect theme can take a while, but it’s worth it.
How to Add Pages in WordPress?
Do you want a Services page, About page or Contact page?
Log into your WordPress dashboard and type in: http://yoursite.com/wp-admin (replace “yoursite” with your domain).
From the left menu, select Appearance > Pages > Add New.
Add the page title and page content, which can be a mix of text, images, and videos. Once editing of content is complete, hit the ‘publish’ button.
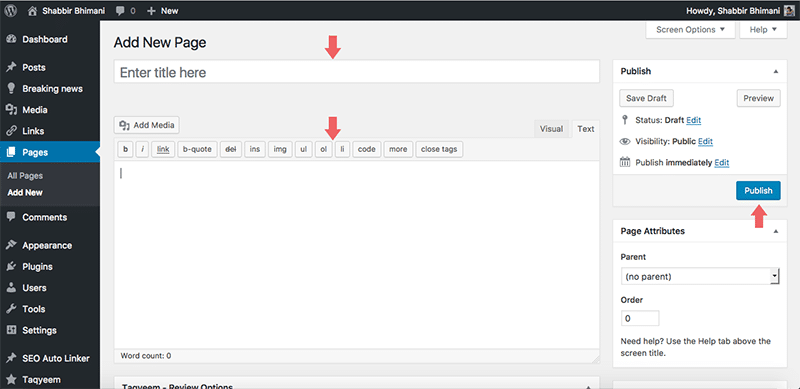
Note: If your page takes a long time to write (like this guide, which is a WordPress page), you can save it as a draft. WordPress will also autosave the drafts for you as well.
How to Add the Pages to the Navigational Menu?
Once the page is published, you can add it to the navigation menu.
Log into your WordPress dashboard and type in: http://yoursite.com/wp-admin (replace “yoursite” with your domain).
From the left menu select Appearance > Menus
Depending on your choice of theme, the placements of the menu can vary. However, the process of adding an item to the menu remains the same.
Check the pages that you want to appear in the menu and click on the ‘Add to Menu’ button. Drag the items to order the menu as you want it. Once done, click ‘Save Menu’.
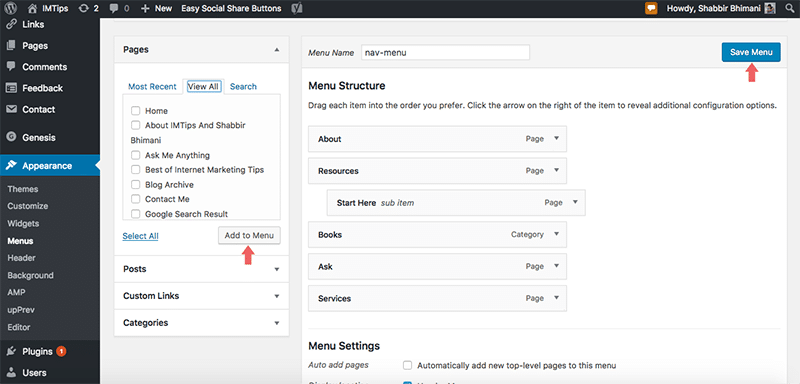
Note: To add a page as a submenu, drag the page and indent it under the parent page.
How to Add Blog Posts to WordPress?
If you want to add a blog, you can use posts. Your homepage can be a list of recent posts, or you can select a static homepage and create a separate blog page that lists your latest posts. The power of WordPress, and yet it is simple.
Log into your WordPress dashboard and type in: ‘http://yoursite.com/wp-admin’ (replace “yoursite” with your domain).
From the left menu, select Appearance > Posts > Add New.
Posts similar to pages have titles, and content, but you can also organize the posts based on categories and add tags to them, which isn’t the case with pages.
What is a Static Homepage, and How to Set it?
Log into your WordPress and dashboard-type in http://yoursite.com/wp-admin (replace “yoursite” with your domain).
From the left menu, select Settings > Reading.
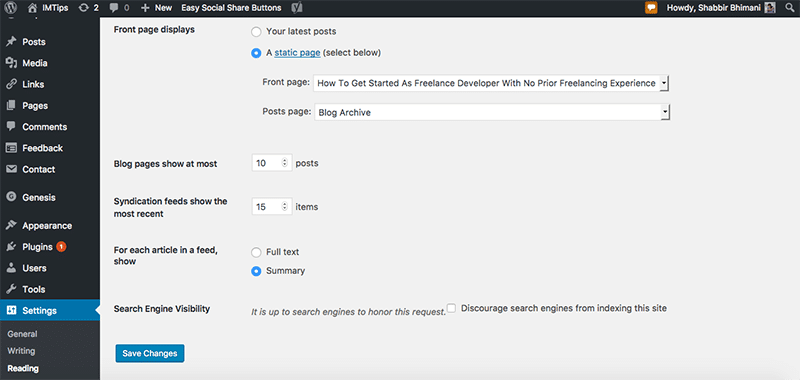
“Front Page” is your home page, the “Posts page” is your blog page.
You can choose any page that you have created as your front page or blog page.
Widgets and Sidebar
Most WordPress themes have a sidebar on the right side (in some cases, it’s on the left). Some themes have widgets for every area of the site like the header, footer or sidebars.
Log into your WordPress dashboard and type in: http://yoursite.com/wp-admin (replace “yoursite” with your domain).
From the left menu select Appearance > Widgets
Drag and drop to add different widgets to your sidebar. If you have items in your sidebar that you don’t want, you can remove them from here.
Play around with the widgets and try adding and removing a few widgets and to see how things change on the front end.
How to Install Plugins in WordPress?
“Plugins” are extensions to expand WordPress’ capabilities, adding to your site features and functions that aren’t built-in.
Installing plugins is pretty much the same as installing themes.
Log into your WordPress dashboard and type in: http://yoursite.com/wp-admin (replace “yoursite” with your domain).
From the left menu, select Plugins > Add New.
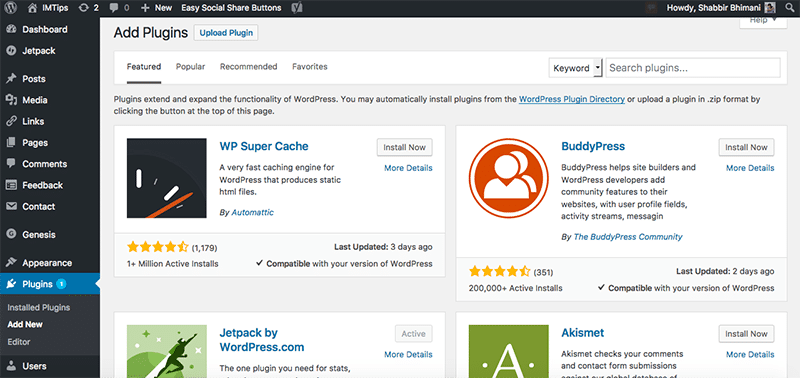
Search plugins and click the “Install Now” button to install the plugin. Once installed, click the “Activate” button to activate the plugin.
Contact Form 7 Plugin: Every website needs a contact form, and you can add a contact form using the Contact Form 7 plugin. Search for “Contact Form 7” and install your first plugin in WordPress.
Once installed, embed the contact form code (found under the WordPress admin Dashboard left menu Contact > Contact Forms) on a new page and publish that page as Contact. After publishing the page, hook up the page to the theme’s menu.
There are more than 30,000 FREE plugins to choose from and also check out Essential WordPress Plugins.
Congratulations – you’ve Built a Working Blog in WordPress!
You have successfully started a fully-functional blog in WordPress! Isn’t that amazing. It is not the end but a start in the world of opportunities with sites and WordPress. Next, one should Add Google Analytics to WordPress. Over time one may need to apply WordPress SEO Checklist To Maximize SEO of a WordPress Blog and Start Earning from a Blog.
Let me know the website you just launched, and if you have any questions, don’t hesitate to get in touch with me.
