An easy to follow Paytm seller registration step by step guide to help you onboard the Paytm marketplace aka Paytm Mall as a seller.
Paytm seller registration guide to onboard you to the Paytm marketplace, aka Paytm Mall as a seller. But before we start the seller registration process for PaytmMaill, let us understand the difference between Paytm and PaytmMall.
Paytm vs. PaytmMall
Paytm is a user interface through which you can make or receive payments. Besides, a user can make bookings, recharge, or shop products. The user registration is insanely quick and easy in real-time. It requires only a mobile number to sign up and after that login (via OTP). That’s Paytm, a payment gateway.
PaytmMall, on the other hand, is an eCommerce marketplace just like Amazon India or Flipkart. Here sellers register their businesses and list products. Moreover, the PaytmMall is both for buyers and sellers.

Why Paytm Mall?
As per the stats, PaytmMaill has 140 million active users per month in India! As a seller willing to sell online, shouldn’t the number of users be a reason to start selling on PayTM? Plus, a seller gets the advantage of Paytm’s easy to use the payment method. Payment collection being Paytm’s expertize the order processing is ridiculously fast.
Now that we know the core difference between Paytm payment gateway, Paytm Mall, and why one should consider selling on this marketplace, let’s proceed with the seller registration process.
Paytm Seller Registration
Like I said above, Paytm has devised an insanely easy way to register and log in. The same applies to the seller registration for PaytmMaill as well. If you have an account on the Paytm site, the same credentials can be used to register as a seller.
But before that, you need to keep specific business details and documents ready. Let me list them here for you.
Pre-Requisites for Paytm Seller Registration
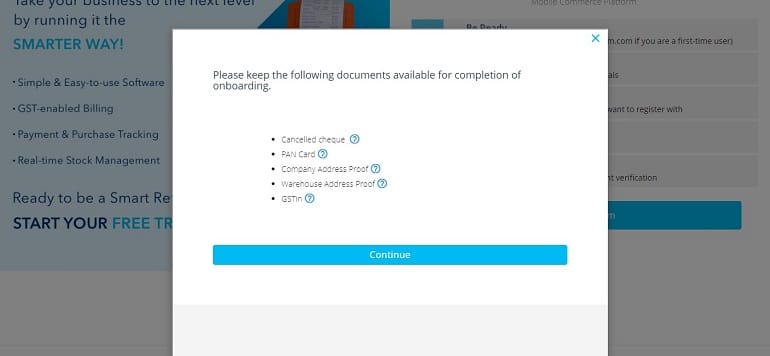
Keep the following documents and information on hand for successful seller registration at Paytm Mall.
- Paytm Login Credentials
- Mobile Number
- Email Address
- Canceled Cheque
- PAN Card Details
- Company Address Proof
- Warehouse Address Proof
- GSTIN Details
Once the above information is in place, you can start the registration process. Let’s do it here for you.
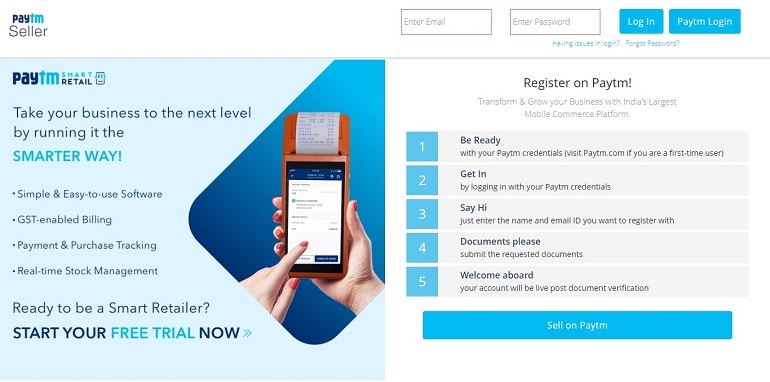
Browse the link https://seller.paytm.com/ in a new tab. The following screen will appear. Here click Sell on Paytm link.
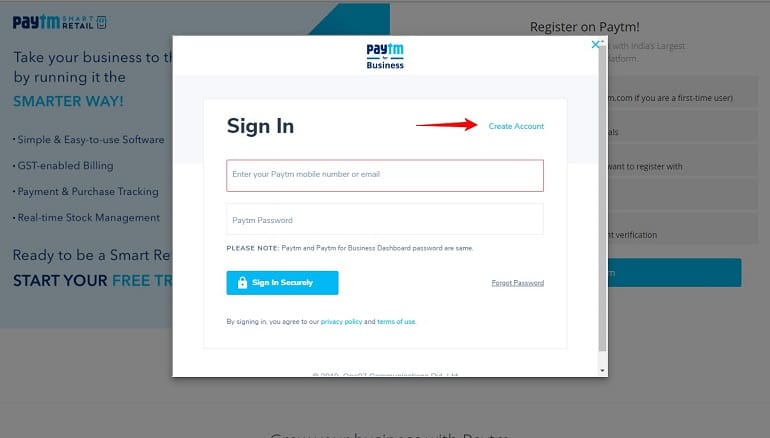
1. Create Account
The point where your Paytm seller registration kick starts. On the Sign In screen, click create account option. Those who are already registered may use it to get into the account.
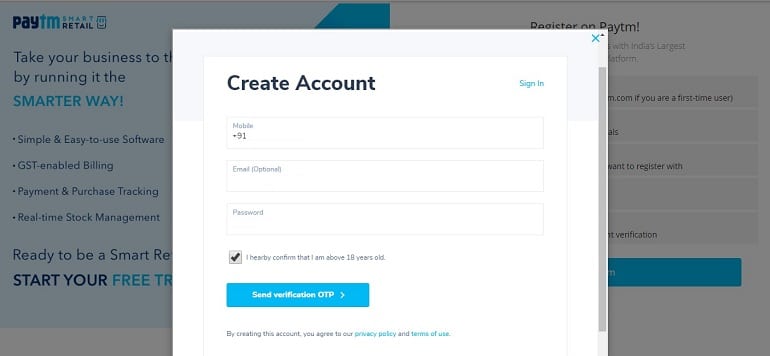
2. Send Verification OTP
Enter mobile number, email address, and password. The system will send an OTP on the mobile number using which the verification process will accomplish. Fill in the details and click send verification OTP button.
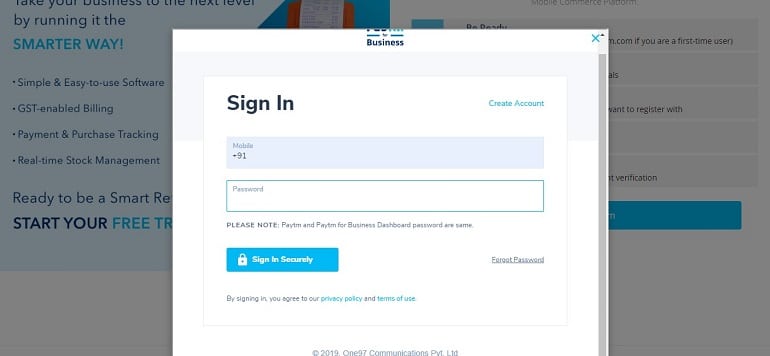
3. Sign in Securely
Once the mobile number is verified, the system will ask you to log in again using the same credentials. It is part of the whole registration process. Doing this, Paytm reassures the ownership of the account. Hence, enter your mobile number and password to sign in once again to proceed further.
4. Document CheckList
After successfully signing in with verified credentials, the system will enlist the required documents. A notification to keep you informed about what is needed. However, the documentation process begins after personal information updates. Let’s move on to the personal info section.
5. Personal Information
Enter the PAN number and select your business type. Private Limited, LLP, Partnership Firm could be possible values as business type. Click proceed.

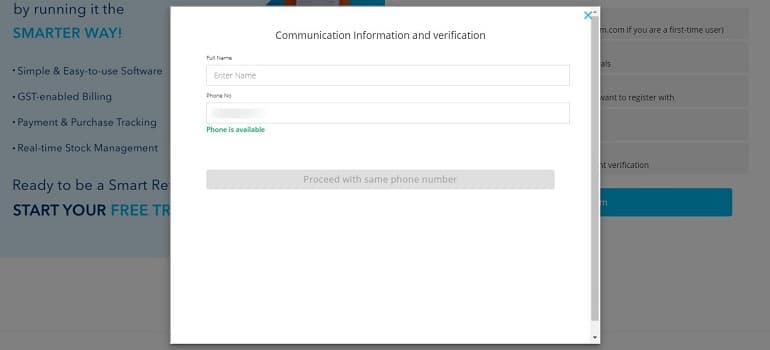
6. Phone Number Verification
Insert your full name and phone number. Do not enter a different phone number. It must match the number used in step 2 above. Use only one phone number to avoid confusion. Click Proceed with the same phone number button when it’s active.
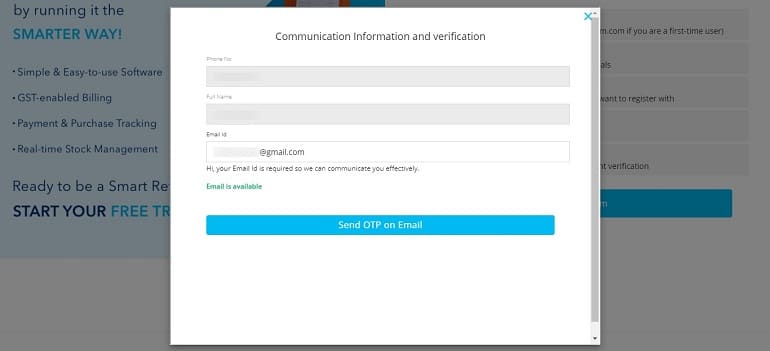
7. Email Verification Via OTP
Now enter your email address to verify it using an OTP. Click to send OTP on email.
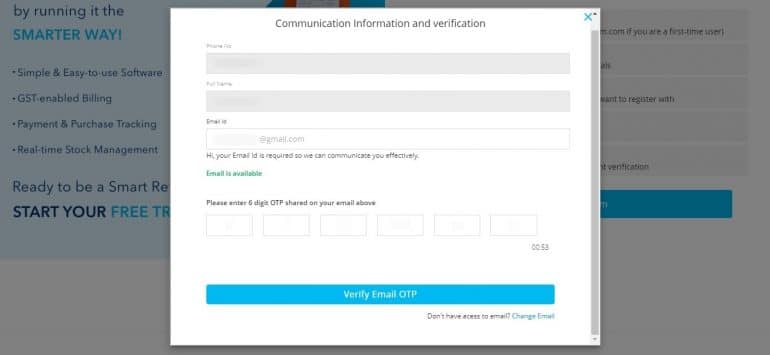
Browse your inbox in a new tab and look for an OTP sent by Paytm mall. Insert the six digits OTP shared on your email. Refer to the image below. The verify email OTP button turns blue. Click and proceed.
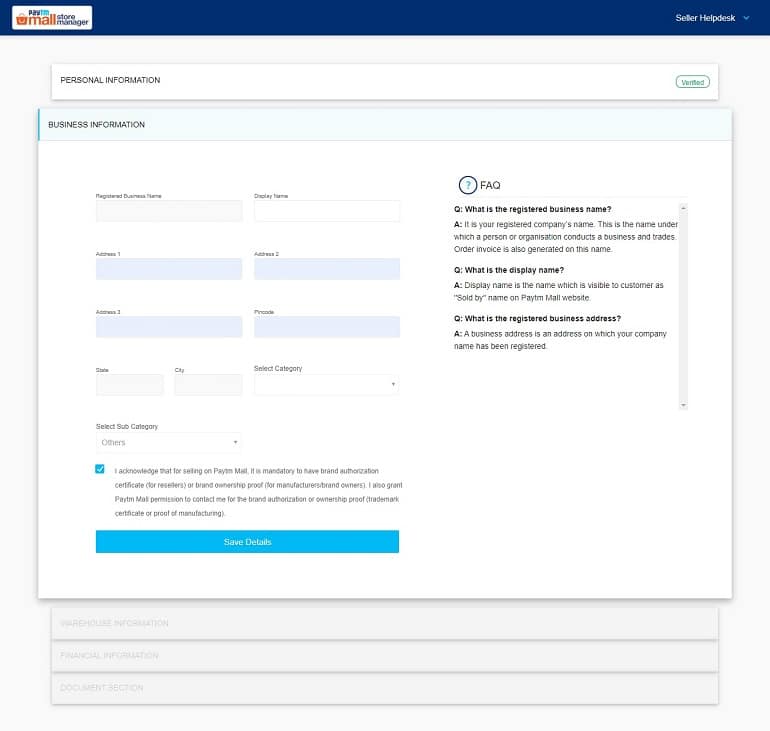
8. Business Information
After personal information, it’s time to feed in the business details. Fill in the required fields and save details. Select the category and sub-category carefully. However, you can always edit these details later at any time.
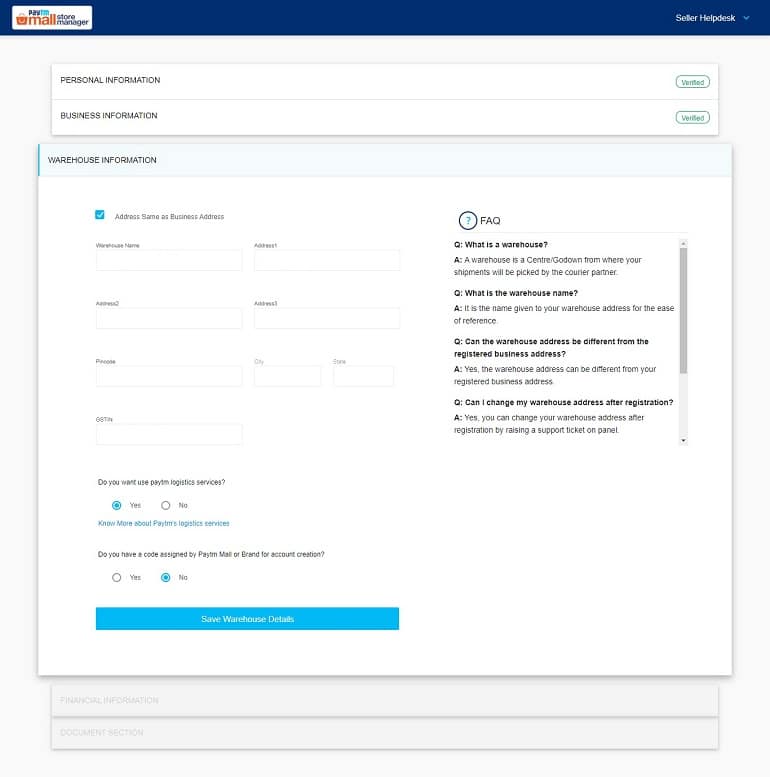
9. Warehouse Information
If there’s a separate warehouse address, then enter the same here. If not, then tick the checkbox Address the same as the business address. Warehouse info is nothing but the pickup address location. It could be different or the same as the registered office address. There’s no problem if both your business and warehouse addresses are the same. Save warehouse details and continue.
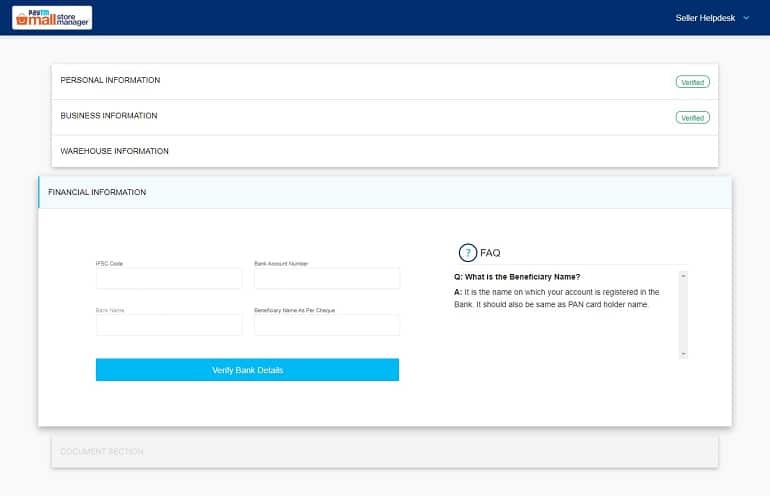
10. Financial Information
The marketplace requires your business bank details. Add IFSC code, and other information will auto-fill. The system fetches bank details based on your IFSC code. Click to verify bank details and proceed further.
11. Document Section
The last module in the Paytm seller registration process. Let’s work it out. You need three documents here. A PAN card, GSTIN certificate, and a canceled cheque.
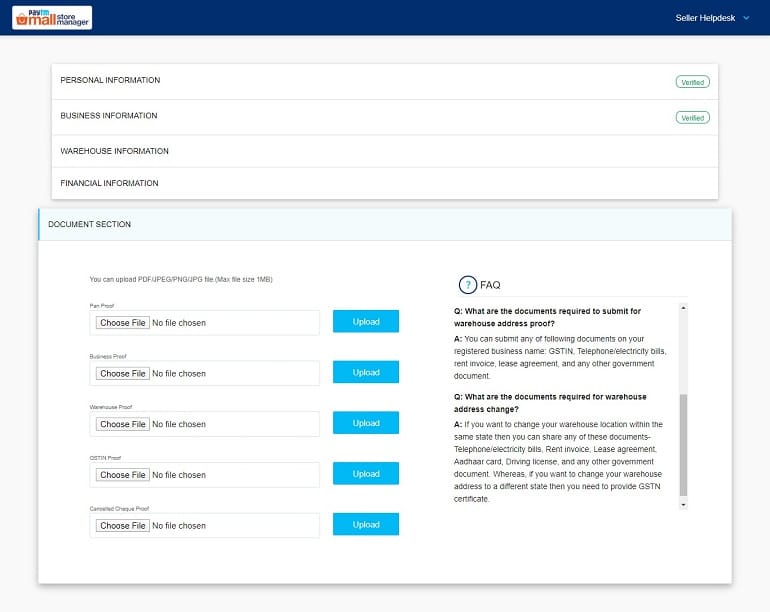
The GSTIN certificate naturally includes your business name and address. Hence upload the same as business and warehouse proofs. It’s legitimate, and your documents won’t get rejected. Use PDF as a standard file format. Click choose file and upload button to submit the document.
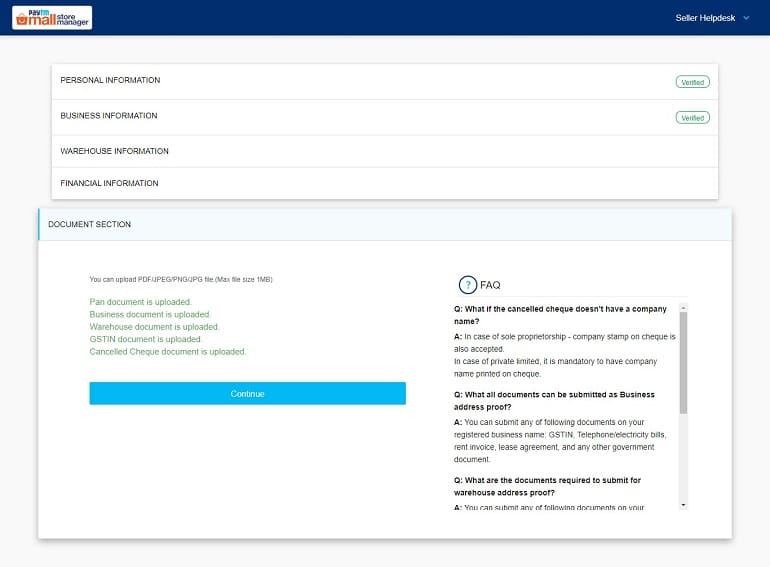
When you are done with uploading documents, click continue. The personal and business info has verified tag, whereas the remaining three sections don’t have it. It means the verification is under progress. It will take around 24 hours to verify and activate your account.
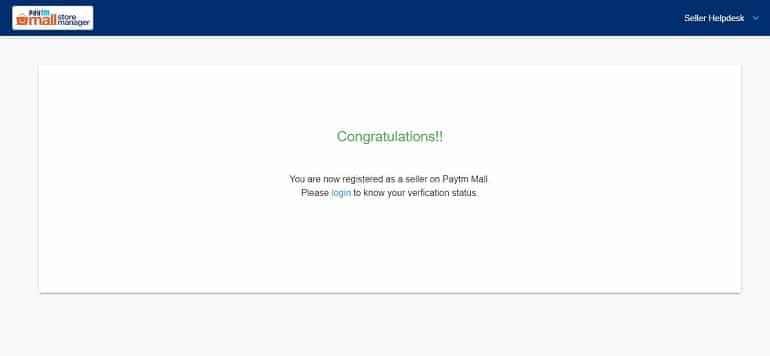
The final congratulations message will display after submitting the documents. Still, the account is under the system’s scanner and will take the standard turn around time for approval.
After Seller Account Approval
Market place agreement is the first thing that pops up when you log in for the first time after approval. It looks like the image below.
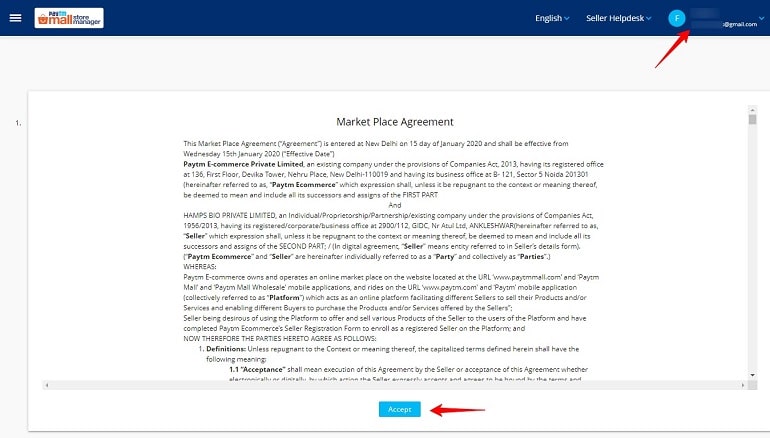
The market place agreement displays when your account is approved. Hence, accept the agreement and proceed further. As soon as you do this, it takes you to the seller dashboard realm. Take a look at the image below.
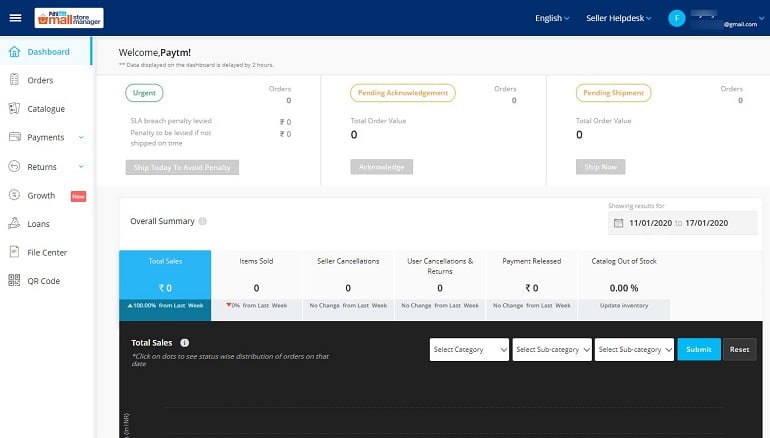
It is the main operating interface officially termed as the Paytm mall store manager. A Paytm mall seller will manage sales and administrative activities from here. All the features and functions are visible only when your account is approved. However, there’s one more way to find out. Let’s see that.
How to Check New Seller Account Status in PaytmMall?
Click check profile status on the right top corner. The screen displays a congratulations message. It means the account is approved and active. It is the place where your store name and registered email address is displayed. You have the sign out option too. On the left panel, the Dashboard link helps you navigate to the seller dashboard or other relevant pages.
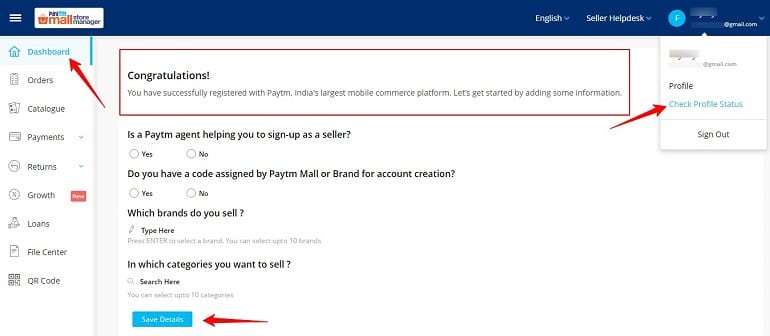
There’s a short questionnaire on the check profile status page. Fill in the details and click save to help the Paytm marketplace to serve you better.
Which Brands Do You Sell?
If you own a private brand, the system won’t accept it unless it is pre-approved by the marketplace. The term is brand approval in eCommerce terminology. Now that’s standard practice. Without approving a brand, you won’t be able to sell on any marketplace. Hence, let’s do this for you.
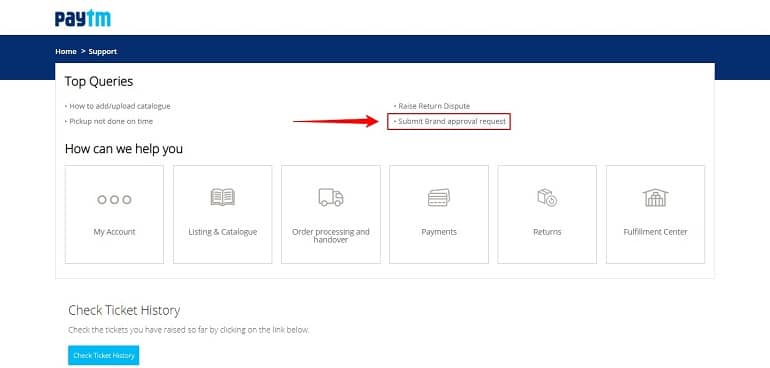
How to Submit Brand Approval Request on Paytm Mall?
Navigate to the seller dashboard. Click the support option under the seller helpdesk drop-down.

It’s the Paytm mall support page you are on right now. Click the submit brand approval request link.
The brand approval request in the Paytm mall is submitted using a support ticket. Here’s a screenshot of the same. Take a look.
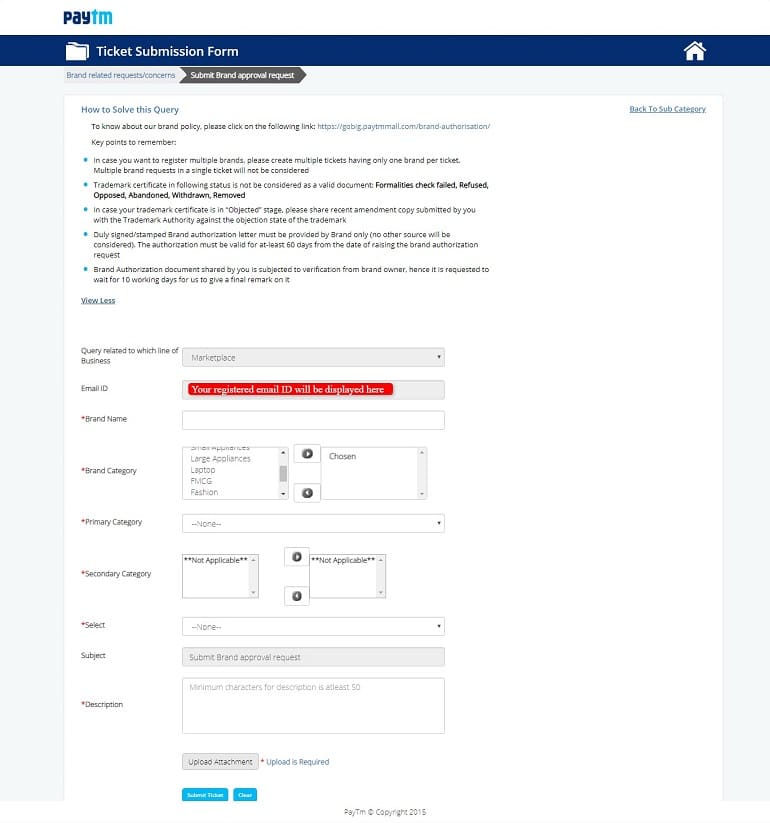
Fill in the details, along with the required documents. Submit the request to the support team by raising a ticket. Remember the ticket number for future communication.
Brand Approval Request Tips
- Write a brand name the way it is in the trademark certificate.
- Select multiple secondary categories to list products simultaneously in all those categories.
- Brand approved in multiple categories will allow you to list products without requesting individually.
- Write something in the description box. It must be more than 50 characters.
- The brand authorization letter format must be as per the Paytm marketplace guidelines.
- A small error will reject your brand approval hence take due care while filling details.
- Don’t forget to upload product images. Without them, the request will be disapproved.
- Submit product images with different angles for pouch two sides and box four sides.
- Bundle all images in a PDF format instead of individual JPEG, PNG, or JPG formats.
The approval process at the Paytm mall marketplace takes around 7 to 10 working days. Follow the ticket number to track the status. If the brand gets rejected for some reason, then contact the Paytm mall seller support using the same ticket number.
Conclusion
Registering and selling at Paytm Mall is a considerable idea. It makes your brand online presence strong. A step further, I would even request you to consider other platforms like Amazon India, Flipkart, ShopClues, and Snapdeal. Account registration and product uploading isn’t a big thing on all of the above platforms.
If you have a diverse product portfolio, then starting with selected 10 or 20 products is a doable thing. Think about it.