3 ways to add Google tag manager or GTM code to a WordPress Blog. Edit header and footer files, or edit functions.php. Finally, use a plugin

There are three ways to add Google tag manager (GTM) to a WordPress blog. The first method is editing the header and footer PHP files within the theme. Next is to edit the functions.php theme file, and finally, if you don’t have any programming experience, use a simple header footer plugin.
We will look into each of them, but let me first share a bit about GTM.
What is Google Tag Manager or GTM?
The Google Tag Manager or GTM cuts down the need for writing codes to track different visitors’ activity. As an example, what is the average page scroll for the user, and how many pages user visits from individual entry pages?
Instead of writing code for tracking each such event, one can use Google Tag Manager.
For instance, you can create a tag that will tell you how many visitors have read a particular blog or say how in-depth they scrolled to read it. Google Tags will send relevant information on an exact activity to Google Analytics or Google Adwords or any other third party tools.
A non-technical user can create tags and track events. Here are a few examples of what one can track in GTM.
Generate Google Tag Manager Code
Sign in to Tag Manager. Do input your account name, country, website URL, and select the container – Web, iOS, Android, or an AMP website. Click create.

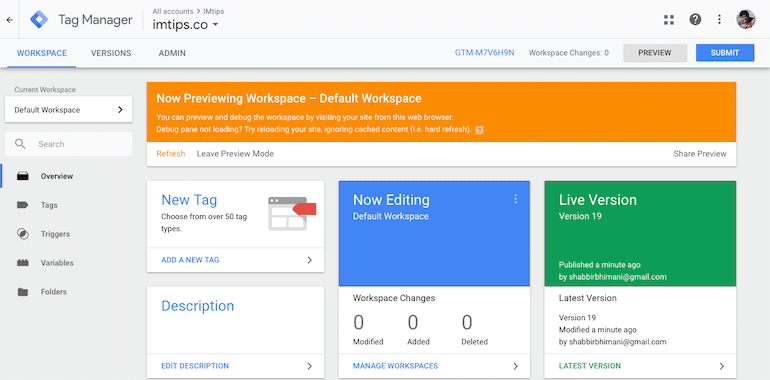
The following example image shows the tag manager dashboard. Look at the unique ID starting with GTM. For example, my ID here is GTM-M7V6H9N. Click on the ID.
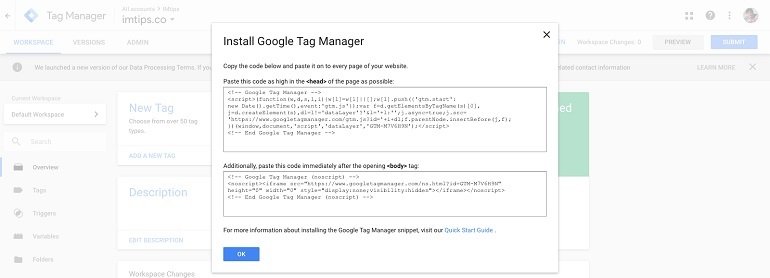
When you click on your ID, the Google tag manager shortcode window opens up. Copy the codes in a notepad file. You will need them in a while to insert them in your WordPress backend.
Now we will head over to your site or blog’s WordPress backend to install the GTM code.
Inserting Google Tag Manager Code in WordPress
Now we will go through all the three ways to enter the GTM code in WordPress.
- Modifying themes Header and Footer Files (Edit HTML)
- Changing themes Functions File (PHP Programming)
- Using a Simple Plugin (No Programming Needed)
Method 1: Insert GTM code to WordPress via Themes header and footer File (header.php & Footer.php)
In the WordPress admin, Click the theme editor under appearance option.
Now you’re on the edit themes page. On the right side, select the theme you want the code to insert the code into. Generally, your theme is chosen as default. In our example, I have taken the twenty-twenty theme.
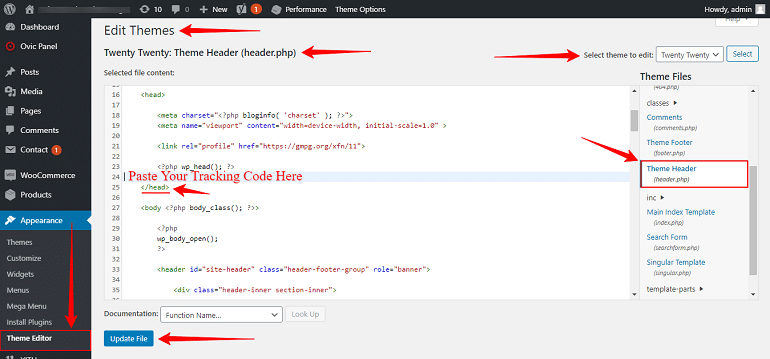
Within the “theme files” section, locate the theme header (header.php). Click on it, and the code of the header.php file will load for you to edit, as shown in the example image above.
Find the closing head HTML tag </head>. Paste your GTM header code above the HTML </head> tag. Finally, click the update file button.
Now locate the theme footer (footer.php). Click on it, and the code of the footer.php file will load for you to edit, as shown in the example image below.
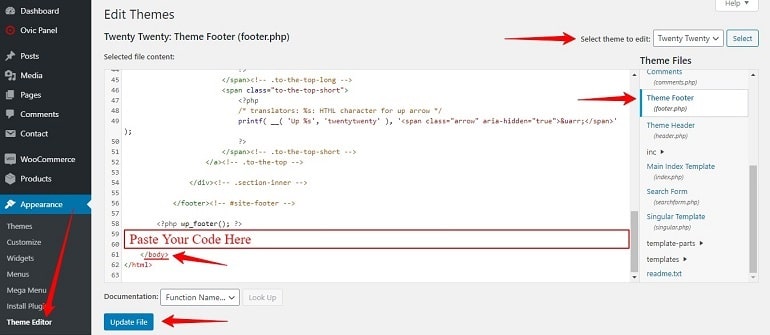
Find the closing body HTML tag </body>. Paste your GTM footer code above the HTML </body> tag. Finally, click the update file button.
Pro tip: Though google suggests adding the code at the opening of the body tag, having it higher at the start of the body tag isn’t something I recommend. Google’s page speed will report it is slowing down the page loading. If you still prefer adding at the opening body tag, you can insert this code in the header.php just after the opening <body> HTML tag and before the wp_open_body function as well.
Your Google Tag Manager code is installed. Once installed, you can connect GTM with Google Analytics.
Method 2: Insert GTM code to WordPress via Themes functions File (functions.php)
At times, in many themes, the header file doesn’t have the HTML head elements. They may be in some other files. Genesis is one such theme where you won’t find the </head> tag in the theme’s header file.
So, in that case, we opt to edit the theme’s functions.php file.
The step remains the same as in the above method of editing the header.php except we modify the theme’s functions.php file.
Scroll down to the end. Copy the code and insert your tracking code between the lines, as shown as comments.
| <?php | |
| //* Copy the above PHP opening tag if and only if your functions.php has a closing PHP tag | |
| function add_gtm_head() { ?> | |
| <!-- Paste Your GTM Header Code Here --> | |
| <?php } add_action('wp_head','add_gtm_head',10); | |
| function add_gtm_footer() { ?> | |
| <!-- Paste Your GTM footer Code Here --> | |
| <?php } add_action('wp_footer','add_gtm_footer',10); |
Then place the code at the end of the functions.php file.
Method 3: Insert GTM code to WordPress via a Plugin
If you don’t want to be dealing with HTML or PHP, we can use WordPress Plugin Insert Headers & Footers by WPBeginners to install the tracking code. Now installing this tracking code manually into a site’s HTML is not something I would suggest you do unless you know how to do it accurately.
To do this, you will first need to install the plugin in WordPress. Follow the steps below:
- Log into your WordPress account.
- Hover mouse on the plugin tab & click the add new option on the left panel.
- Search for the plugin Insert headers and footers in the search bar. Top right.
- Click install now and activate the plugin after that.
Example image for reference purpose.
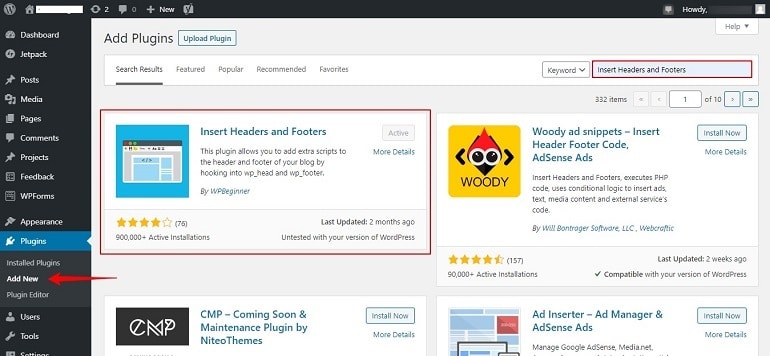
However, you can download this plugin and upload it here using the upload plugin function. There’s no difference in it. Additionally, you can use other similar plugins compatible with your WordPress version. Once the plugin is installed, locate it and insert the Google tag manager code. Here’s how you will do it.
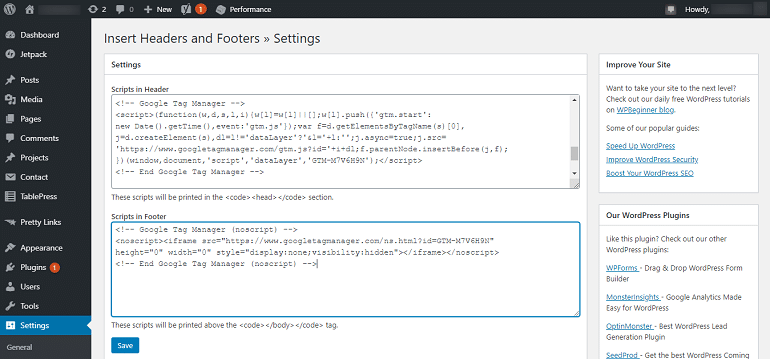
Hover mouse over the settings tab and click insert headers and footers plugin. Now copy and paste the code in header and footer space provided. Finally, click save when done.
