How to create product targeting ads in Amazon India to target ads on the competitor’s product details page and get more potential buyers.
Product targeting Ads are a part of Amazon’s stand-alone CPC (cost-per-click) advertising tool. It enables a seller to promote products via ads on competitors’ product detail page.
How and Where Amazon Serves Product Targeted Ads?
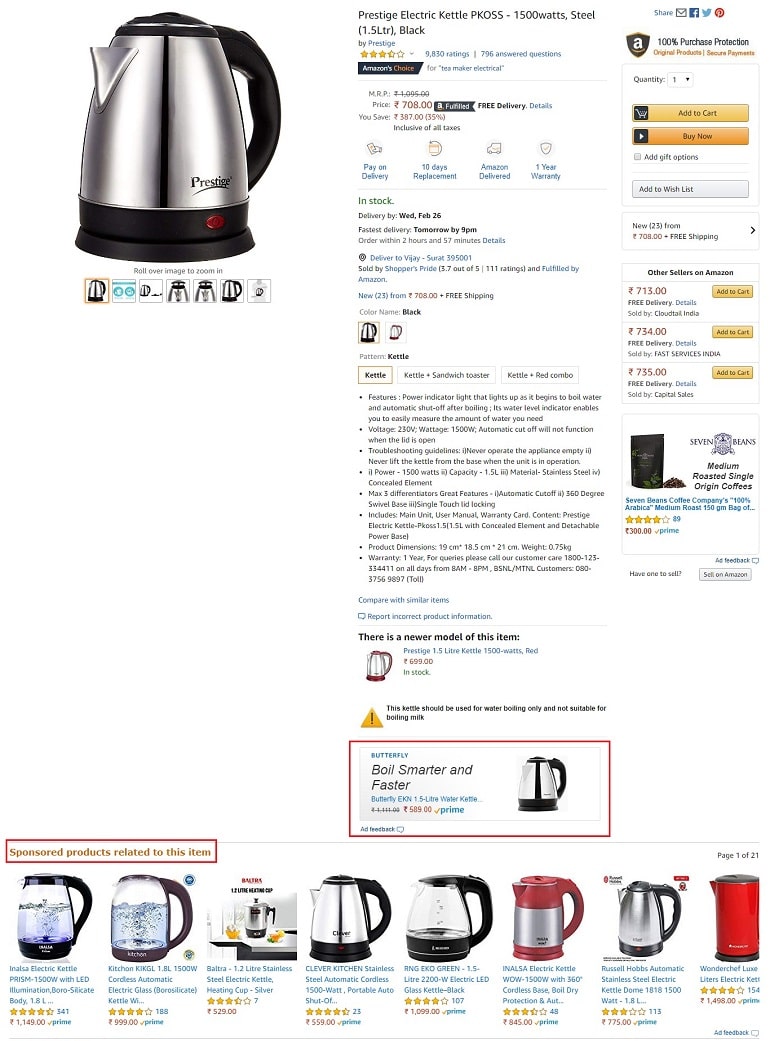
The sponsored products ad serves on desktop, mobile browsers, and Amazon mobile app. The example image below shows the ads targeted for a product. Amazon may include those ads via Automatic ads or if a seller has a manual target ad for the selected product.
Amazon Product Targeting Eligibility Requirements
- Registered & active seller account.
- Ability to ship PAN India.
- Product listings must have Buy Box.
- Not eligible if selling adult, used, or refurbished products.
- Products must comply with marketplace retail policies.
- Must not advertise the product, which is suppressed, inactive, or missing vital product info.
Note: Only the variation (child product) is eligible for advertising
Now that you know about Amazon’s product targeting and its eligibility requirements, let’s create one.
How to Create Product Targeting Ad Campaign in Amazon?
To create a campaign for product targeting:
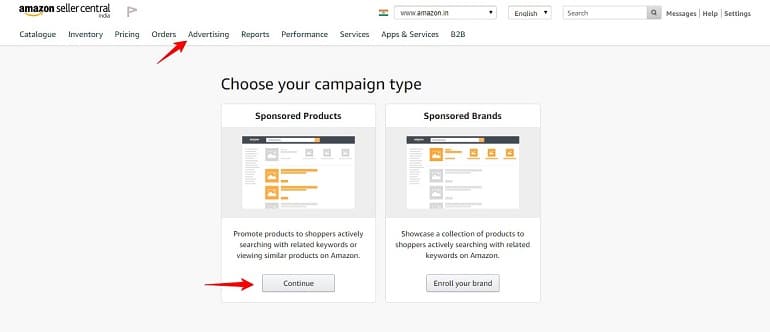
Go to the campaign manager under advertising and click the create campaign option. Here click continue on the sponsored products card. Refer to the image below.
On the create a campaign page, enter information in the settings section.
Campaign Settings for Product Targeting
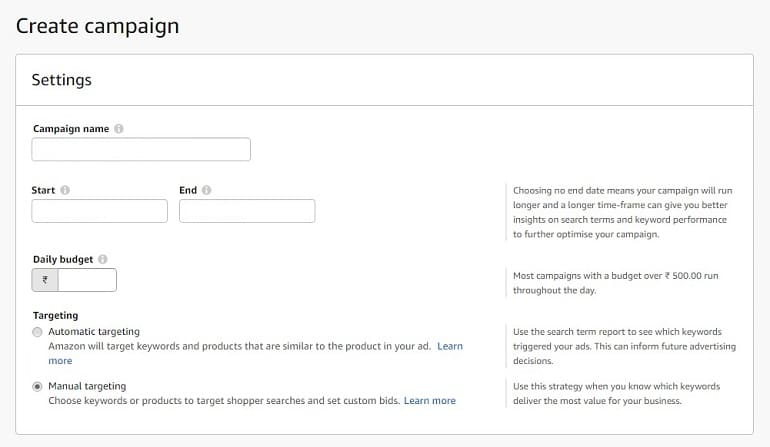
- Campaign Name: Enter a suitable name for your campaign. The name won’t appear in ads and will be invisible to buyers. Name your campaign smartly so that you can easily find and refer it later.
- Start/End Date: The system will enter the current date as the default start date. However, you can change and set a future time too. If you are running a seasonal product campaign, set an end date or leave it blank. Leaving the end date blank means you don’t want the campaign to end.
- Daily Budget: It is the average amount you are willing to spend on a single day in a campaign. Every campaign will have a different daily budget.
- Targeting: In automatic targeting, the system matches your ad with search phrases triggered by buyers. Whereas in the manual, you need to add products are having keywords that would trigger your ads. Here select manual targeting and proceed.
Campaign Bidding Strategy in Product Ads
Amazon provides you with three bidding strategies. Selecting any of them will apply to the entire campaign. However, they are pretty much self-explanatory. Let’s have a brief intro.
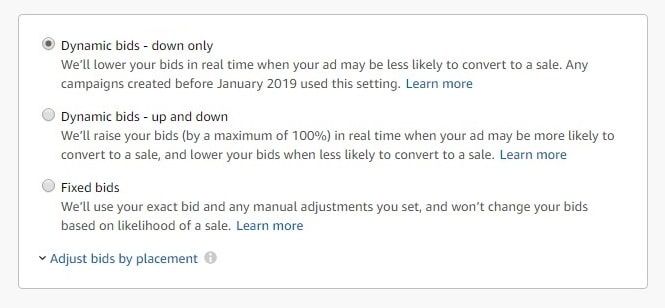
- Dynamic bids – down only: The system will reduce bids for clicks that may be less likely to convert to a sale.
- Dynamic bids – up and down: Here, the system will increase bids for clicks that are more likely to convert to a sale. In the same fashion, it will reduce bids for clicks less likely to convert into a sale. In short, your bids are fluctuating up and down in a rundown to make a sale.
- Fixed bids: No adjustments are made here. The system will use the default bid without changing it.
Compared to dynamic bidding strategies, fixed bids draws more impressions. As a result, you get fewer conversions for your ad spend. Hence, dynamic bids can be an ideal strategy for you.
Creating Ad Group

Ad groups contain similar keywords to target for a product. It’s good to bifurcate and group them based on the products. You can later on add, edit or delete ad groups once the campaign is ready. Name your ad group here and proceed to product selection.
Select Products
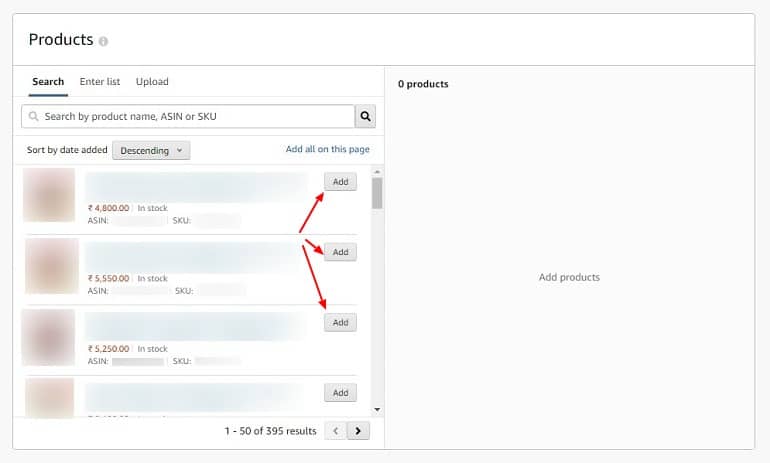
The system auto-populates the list of products. You need to add them using the add button. Additionally, you can enter individual products using their unique ASINs. Refer to the section beside the search. Usually, products in your catalog are visible in the search section. If there’s any product left out, then find and add them using ASINs.
Now move on to set up the targeting.
Targeting

As shown in the image above, the system allows two types of targeting viz keyword and product. Click the radio button product targeting.
How Does Product Targeting Work?
Using a product target option, you can advertise your products on other product pages, especially your competitor’s product detail pages. To do this, select specific products, categories, brands, or other product features where you want to show ads.
In short, a seller can showcase his/her products on someone else’s product listings, which are selling similar items. According to Amazon, You can target categories and products individually or target a combination of categories and brands in the same campaign.
PS: The Amazon marketplace allows only one targeting type per ad group. Create a different ad group to devise another targeting type.
Upon selecting product targeting, the system will display suggested categories. A target button will activate and display. Click the button to display your ads on category detail pages and search results. See the below image.
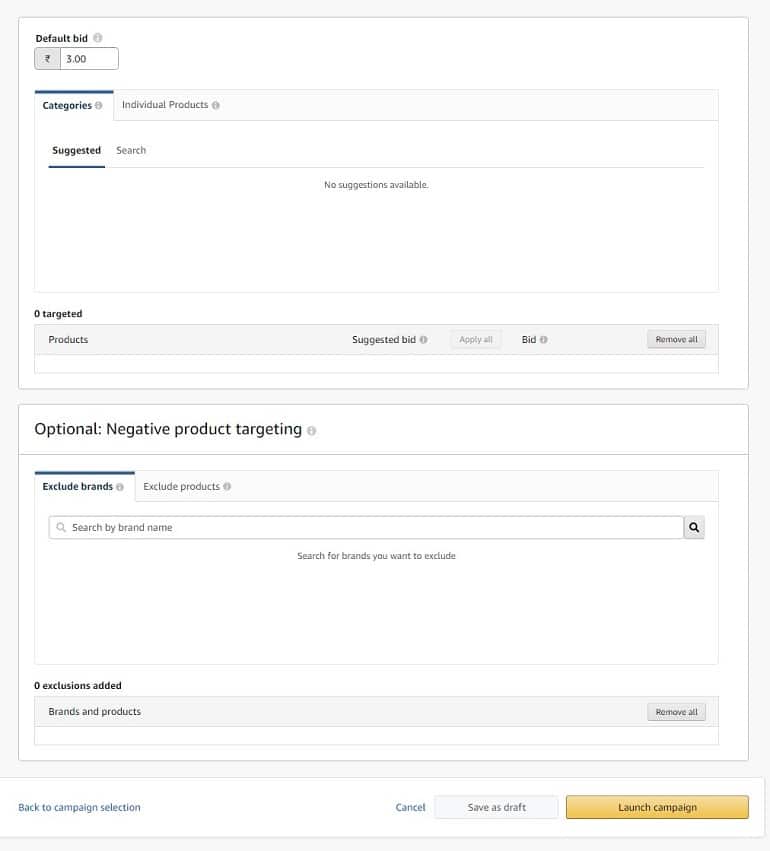
The individual option products allow you to target specific items that are similar to your product. Furthermore, there are four different methods to find products to target. Select the suggested items by the system, search, enter ASINs of items, or upload an excel template. Once you add the items, click the target.
Surprisingly you have a provision of optional negative product targeting here. A seller can also exclude particular brands or products from targeting. This way, he/she can eliminate the possibilities of unwanted spendings.
Once you figure out all options on a campaign, hit the launch campaign button. Your product ads are now ready to reach buyers. Wait for a couple of hours for the system to start showing ads.
How to Add More Competitor’s Product to Target Ads in Amazon?
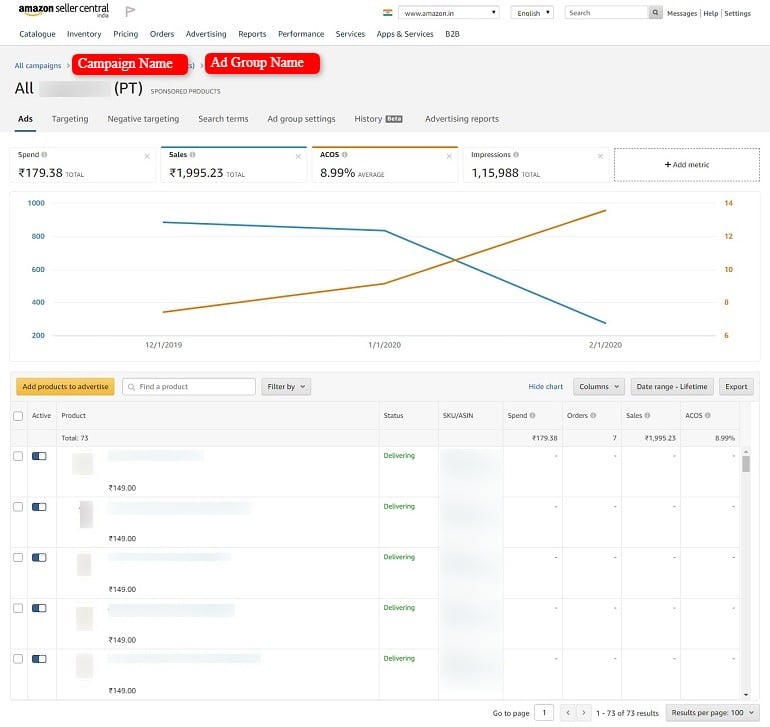
Enter into the campaign manager to see your product ads campaign. The navigation will be like – All Campaigns >> Campaign Name >> Ad Group Name. The same is visible in the example image above.
The ad group page shows a chart of how your ads are performing. Just below the chart, there’s a button to add products to advertise. When you click it, a pop-up window opens up asking in case if you want to add more products. The process is similar to adding products while creating a campaign.
A step further, the system allows a seller to activate or deactivate individual products. See that blue button in the image above. Besides, a seller can identify the status of ad delivery. Usually, it’s in a delivering (green) state, but it may show ineligible (red) if a product is inactive or not in the buy box.
Targeting Tab
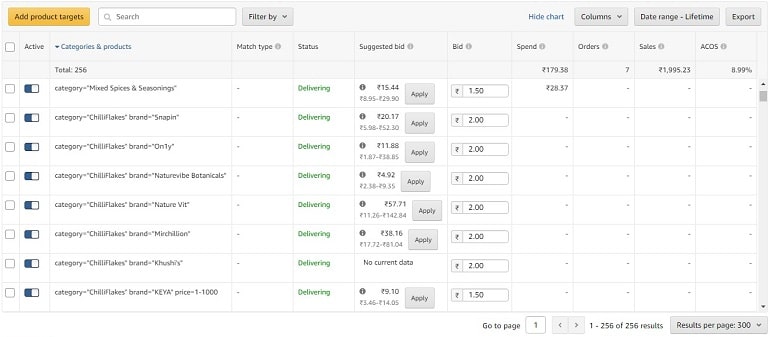
Here you will find the list of categories and products that you previously selected while compiling the campaign. The same you can do after creating the campaign. Click add product targets button to choose categories and individual products. To help with the selection, the system will pop-up a window with a suggested list of products & categories.
Plus, the system will display suggested bids for each category and products. Alongside the recommended bids, the system tells you the range of a particular bid too. Look beside the apply button. Whatever bid you allocate to a product or category will display in the bid section next to the suggested bid.
Hence, using the targeting functions, a seller can optimize to maximize product ads reach and sales.
Negative Targeting Tab

Negative targeting both in manual and product ads work identically. Adding negative product targets keeps your budget in control. You can eliminate certain products, categories, and brands. In short, you decide whether or not a particular product page will show your ads. Total control, I guess!
Search Terms Tab
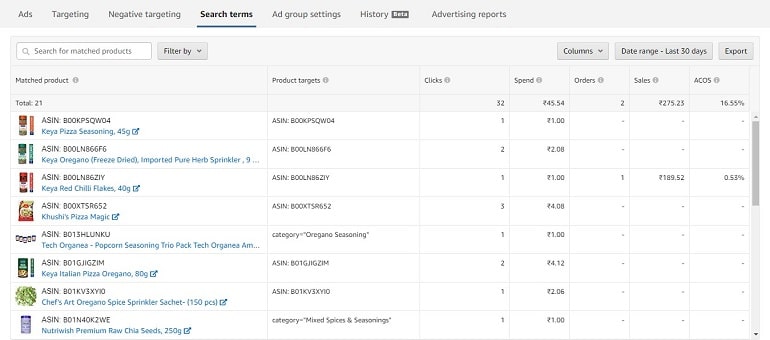
The search term list shows products that matched with categories targeted by your ad-group. Instead of real-time keywords and phrases, you will see individual products with their ASINs. This way, you get to know how your product ads are performing on targeted product detail pages.
Besides, this valuable data will help you further optimize your ad groups on performance levels. Refer to the image above. Each ASIN provides you with a total number of orders, sales, and advertising costs of making sales.
Ad Group Settings

There’s nothing more to do here except for a couple of settings. For example, one can rename ad group, activate, pause, or even archive it. On top of all these traditional settings, you can change the default bid here. That’s the base price you are willing to pay for a click.
History
These two sections are informal. History shows you the series of changes that you have made in an ad group since its inception. Usually, for reference purposes, this data is uneditable.
Advertising Reports
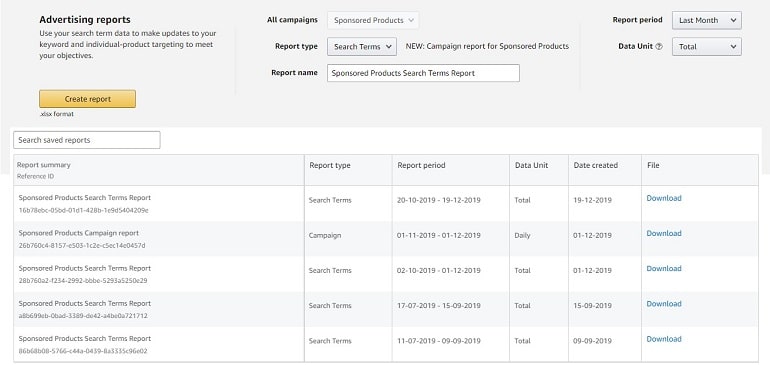
Advertising reports are self-explanatory. It’s obvious what can be done here. The above example image shows my search term reports download. In the same fashion, a seller can obtain performance, advertised products, campaigns, and placement reports. The system preserves the download history for future references.

