Footer Slideup Forms are best ways to get readers subscribed. A WordPress plugin to configure AWeber forms for a Footer Slideup
There are many Footer Slideup forms available for AWeber, but the problem is they all charge for the script, and that is not one time fees but a monthly fee for the script.
Being a developer, I thought of creating my own, and many of my clients, as well as blog users, asked the same script from me, and so here I come with my first official WordPress plugin AWeber Footer Slideup.
Plugin Description
Footer Slideup Form is one of the best ways to ask your user to subscribe to your list without any interruption or blocking, and this plugin does exactly that. It adds an AWeber subscribe form in the footer of your WordPress blog.
AWeber is one of the better Auto-responders in the market, and it allows you to send a series of email messages to subscribers. You can read my detailed AWeber review.
Brief Installation Instructions
- Generate an Inline form using the AWeber Webform Interface.
- Grab the HTML code of your AWeber Form and Search for Hidden Div, which lists all the hidden form fields for a subscription. You will see it just after the <FORM> tag.
- Upload the plugin folder aweber-footer-slideup in the wp-content/plugins folder.
- Activate the plugin through the ‘Plugins’ menu in WordPress
- Edit Options under the Menu ‘AWeber Footer SlideUp’. Paste the hidden div HTML Code generated in Step 2.
Detail Installation Instructions
Very detailed installation instructions with screenshots to help you get started with the plugin.
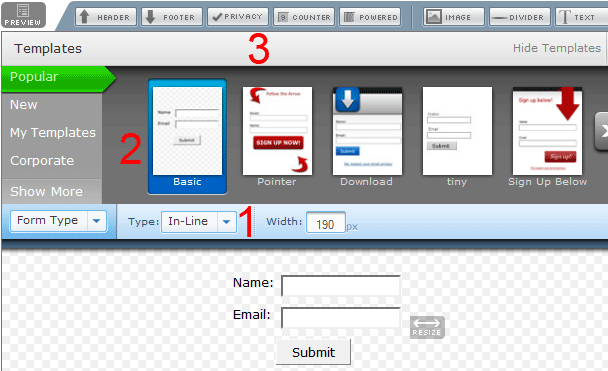
Step 1 Generate Inline AWeber Web Form

- Opt for In-Line Form Type (marked as 1 in the above screenshot)
- Select the basic form design template (marked as 2 in the above screenshot)
- De-select header, footer, privacy, counter, powered options. (marked as 3 in the above screenshot)
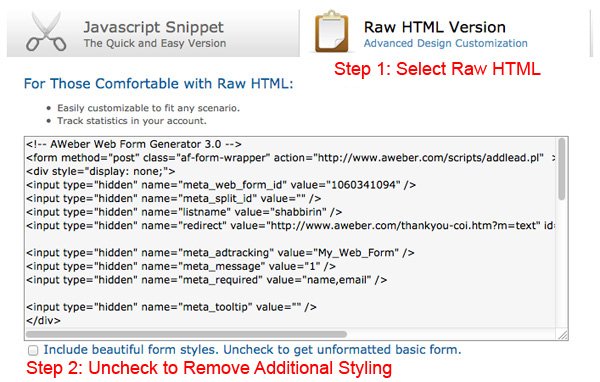
Step 2 Grab RAW HTML code of the form
Change the form settings as you normally do in step 2 of web form creation in AWeber and when you reach step 3 i.e. publish your form opt for Raw HTML version of the code and un-check the checkbox to get the unformatted basic HTML code.

Sometimes the un-formatted checkbox malfunctions and if it does not work as expected make sure you save the form and then come back to the publish page again to generate the un-formatted HTML form.
Step 3 Upload and Activate the plugin
You can use the WordPress plugin interface to install the plugin or else you can download the plugin and manually upload the aweber-footer-slideup folder under the wp-content/plugins folder. Once uploaded activate the plugin through the Plugins menu.
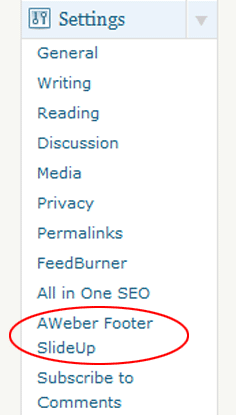
When the plugin is active you will see AWeber Footer Slideup options in the bottom left corner under the settings menu.

Click the link. The link is http://yourblogurl/wp-admin/options-general.php?page=awfs
Step 4 Configure the Plugin with the HTML code
Once you are in the admin options panel for the plugin you see 3 fields.
The tagline is the content shown as heading which can be anything you want to display a message to your user.
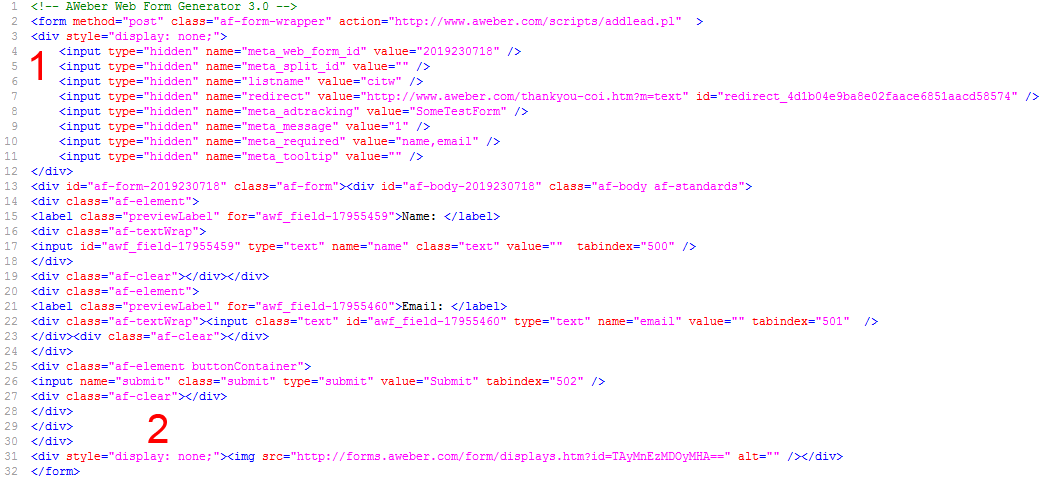
For Hidden AWeber Form Fields (Required) we will use the Raw HTML AWeber code. Search for Hidden Div. i.e. the code between <div style=”display: none;”> and <div> . I have marked the code as 1 in the screenshot below.

Copy everything between the div and paste it in the text area you have for Hidden AWeber Form Fields. This is the minimum you will require to do for the plugin to work.
Optional Fields
To add the tracking image find a second hidden div (Mark 2 in the above picture) where AWeber has the image to track views of the form and calculates statistics like submissions to unique display and submission to display.
<div style=”display: none;”>
Copy the image src url and place it into the Tracking Image URL of the AWeber Webform (Optional) field.
FAQ’s
How to Edit the Tag Line Subscribe By Email for Weekly Updates?
Heading Tag Line (Optional) in the admin interface of the plugin. Leaving it blank will show the default tagline.
What is Tracking Image URL of AWeber Webform (Optional)?
AWeber RAW HTML Webform tracks the form views and other stats with an image. If you would like to see how many users submit using the footer form, you need to add the unique image url of AWeber into the field value. Just near the form end tag you will see <img src=”SomeValue” border=”0″ />. Just copy the SomeValue from the HTML code and past it in Tracking Image URL of AWeber Webform. The Image URL will not be any normal jpg/gif like image.
I completed all the above steps and yet I don’t see the plugin in action?
Your plugin should support the basic hooks in the header and footer for the plugin to work. Make sure you have
- somewhere in the header.php file. Ideally in <head>
- somewhere in the footer.php file. Ideally just before the </body> tag
I hope the installation instructions are more clear now but if you still have any queries or questions don’t hesitate to post them in the comments below. I will be more than happy to help.
