How to add products in Google My Business to dominate the Google search engine rankings and rank higher in Google without doing any SEO.
Adding products in Google my business tool helps merchants showcase their products prominently in Google search and on maps to drive consumer engagements.
This feature works great for both online sellers as well as brick-n-mortar shop owners.
So, without much of an ado let’s drill down this fantastic feature.
Two Ways to Add Products in Google My Business Tool
There are two methods using which one can add products to their GMB local listing. Both options are located on the left panel of the tool dashboard.
- The add product option under post
- The product (beta) option
The product option is still in beta but is the recommended option to Add Products to Google My Business.
Since Google introduced the new product (beta) option the old one is now only limited to adding business posts more than products.
If you look closely there are four options at a user’s exposure under the post feature. A user can add an update, event, and offer along with products relevant to the business.
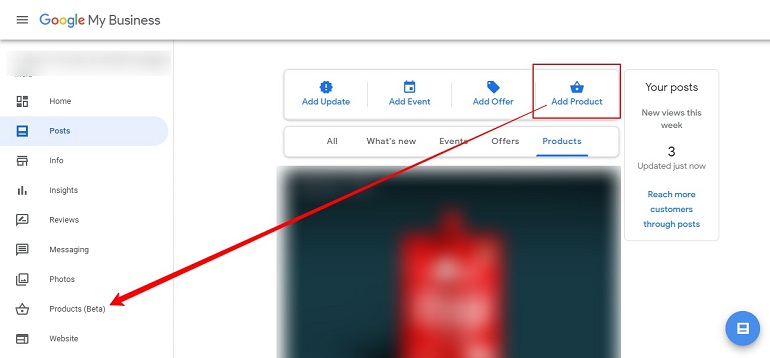
In the next section, I will show you how to easily add products using the new product (beta) function.
Additionally, I will also show how to quickly optimize a product listing for maximum benefits.
So let’s get started.
How to Add Product in Google My Business?
Log into Google my business listing tool using a Google account. On the left panel locate the product (beta) option and click on it.
Click on the Get Started button to start adding products.
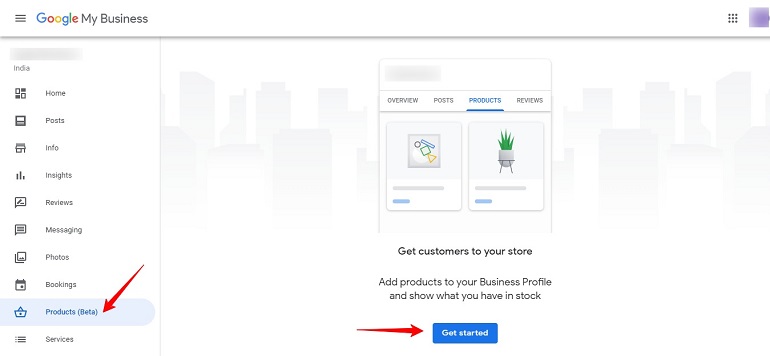
When you click on the Get Started button the add product appears.
Before adding a product a user will have to define a product category. Now, this is something you won’t find under the other way to add products.
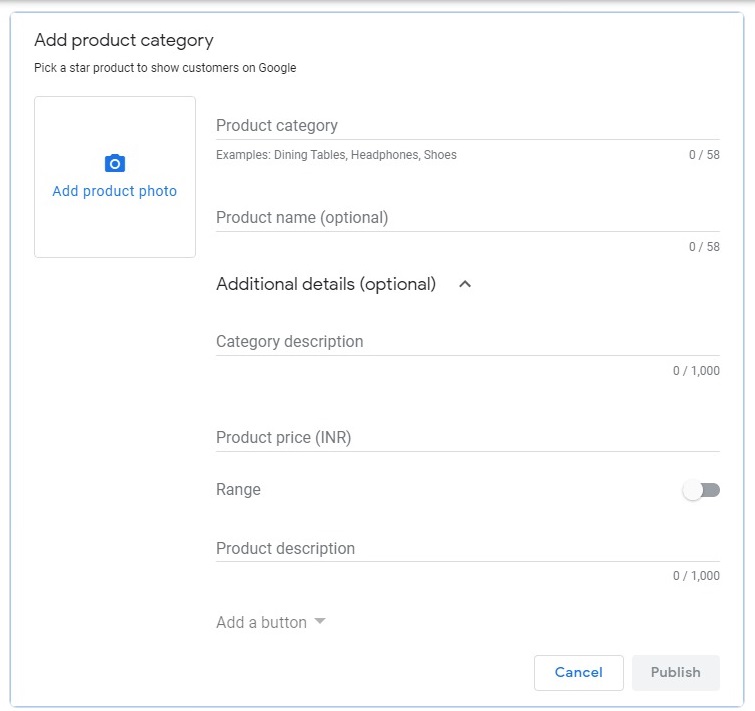
Product Category
Define the exact category of a product. Be very precise. It’s directly related to users searching. For example, Men’s Shoes, Leather Bags, Food Products, etc.
There’s a limited space of 58 characters. It’s a scarce resource hence, use wisely.
Product Name
Although it appears to be optional actually it’s not. Write an easy to understand product title. Remember, there’s only 58 character space limit. Make a keyword-rich title. Insert at least one keyword in the title along with the product name.
Check out my quick guide on how to write effective product titles.
Category Description
1000 Characters! That’s too much for efficiently optimizing category description with highly searched keywords. Describe the category here. Tell customers what kind of products you offer in a particular category.
Product Price (INR)
The product price is by default in Indian rupees (INR). Insert a product price your buyers would easily afford to pay. This is the best part of the GMB tool. Your product is clearly visible with price in Google search.
Range

The range is related to the product price. You can set a minimum and maximum price range for your products. Use the toggle button to do so. This feature is helpful when you have a wide variety of product variations.
For example, Coffee. Let’s assume there are different coffee packs of 50g, 100g, 200g, and 500g. Each pack has a distinct price. Hence, use the range function to set a minimum and maximum price of each coffee pack.
Product Description
We have two descriptions viz product and category. Here’s the space to insert product descriptions. It’s similar to the category description. Make it keyword rich. Maintain relevancy with the product title.
Add a Button
When you create a product listing in the GMB tool it needs to take the customer somewhere. This somewhere could be your personal website or an eCommerce marketplace like Amazon, Flipkart, etc.
The product widget (right now what you are reading about) is just an overview. It gives a limited piece of info to the customer.
To make a purchase decision the buyer has to have more details. For that, we have a button element in the product widget.
The button when clicked will take the customer to a destination where he/she can order it in real-time. Refer to the example image below.
Types of Button

Primarily there are 4 types of buttons available in the tool – Order Online, Buy, Learn More and Get Offer. For products use Order Online and Buy buttons. If there’s a special offer use the Get Offer button. For everything else use Learn More.
Add Product Photo
Use high-resolution product images. Product image is the first thing a customer will look at. The textual information comes afterward.
Add product images having a resolution of a minimum of 2000×2000 pixels. One can use creatives also to showcase products beautifully.
I will recommend a graphic tool called Canva. I recommend using Canva for creating images.
Publish
Once every information is in the right place go through the product listing. Check for potential spelling and grammatical errors.
If possible use the free Grammarly tool. This tool will help you craft an excellent product listing content.
Example Image of a Product Listing
The following image explains how your product will look after finally publishing it.
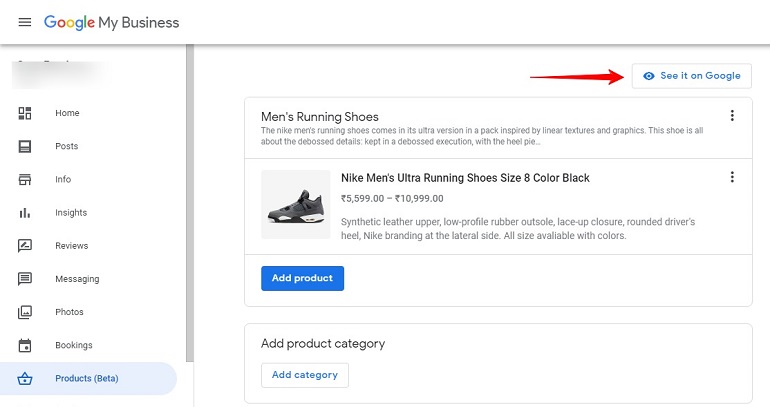
Look at the eye icon with a red arrow in the above image. Click on it and it will take you to the search page.
Also, refer to the Complete Guide to Setup a Google My Business Page.
Benefits of Add Products to the GMB Local Listing
If you ask me the benefits, I would say they are countless. However, every online seller must add products to their local listing due to following reasons:
- Customers can directly land on website product pages.
- A seller can share offers with customers directly in Google search and maps.
- It’s free. Seller doesn’t need to pay commission or rent to list products like other marketplaces.
- Customers can access product info without visiting the website.
- The tool displays much-needed product info free of distractions.
- Reviews below the products can help a customer make instant purchase decisions.
- Sellers can create keyword-rich product listings to leverage high search rank.
- There’s no limit to adding products. It’s unlimited.
- The more product you add, the more exposure your gain in the Google SERPs.
- The tool is mobile-friendly. Customers can easily browse products on mobile devices.
- Sellers can share product listings on other social media networks.
Pro Tips to Optimize Product Listings in the GMB Tool
- Don’t generalize the product category. Example, Food Product. That’s too generic.
- Specify the exact category. If the product is Nescafe 50g Glass Jar then category must be Coffee Powder not Food Products.
- Include brand, color, size, flavor, version, and specifications in the product titles.
- Insert keywords in the description.
- Maintain keyword relevancy in the name & description of product & category.
- Create a separate listing for each variation. Example Coffee 50g, 100g, 200g, 500g, etc.
- Add a single product & create a price range of each variation. Example, Coffee Powder. Min price Rs.150 (50g) & Max price Rs.999 (500g).
- Enter the maximum price higher than the minimum price.
- Don’t stuff keywords. It will make hard for customers to read & believe.
- Introduce the product in description & show it’s different uses to customers.
- Give product usage, storage & maintenance tips if any in the description.
- Give insider details about how your products are made. Any special process if any.
- Wrap the product description into a story. People are more interested in stories than boring descriptions.
- Talk about product delivery, discounts, special offers currently running.
- Test Order Online & Buy buttons. Create product listings using the alternate button.
Final Thoughts
GMB is a prominent tool to build a business online. There’s something for everyone. If you are an eCommerce seller, you can showcase products and attract customers.
The best part is the excellent display of product info. When customers get the vital info like price, product name and description easily they certainly browse for more.
