A step by step guide on how a new Amazon India seller can start advertising for his or her products. The interface is super easy and intuitive.
Every seller wants to make more sales sooner or later. As an Amazon India seller, it is very tempting to start creating your ads so that some sales start pouring in. The best way to do this is the auto targeted ad campaigns.
But before you start spending on advertisement, it is important for a seller to optimize the listing and opt for the FBA program to target Amazon India prime customers.
If you haven’t done, both, I will recommend you to get it done as soon as possible.
If you have already done that, let us continue with creating the auto-targeted ad campaigns for our products at Amazon India.
In a word creating product ads on Amazon India is easy. It helps the seller reach potential buyers who are searching for similar products.
Amazon India offers a user-friendly product advertising platform aka “Sponsored Products” in your seller panel.
The whole idea of sponsored products on Amazon India is to let your products appear to more potential buyers when they search. Especially, on the first page of search results.
You can set your daily budget limit and control the amount you spend to advertise your products which will maximize your profits.
On the positive side, detailed performance metrics in advertising dashboard helps tune ads and achieve better results.
Key Benefits of Sponsored Products:
Let me list some of the key benefits of sponsored product listing at Amazon India.
- Maximum product discoverability
- Target buyers searching for similar products instantly
- Ads appear quickly on Amazon search results pages
- Launch sponsored ads in minutes
- A daily budget as low as Rs.1 to start with
- Total control over cost per click
- Optimize ad campaigns for better performance
- Free ad credit worth Rs. 2000 by Amazon India
- No monthly minimum commitment
- Advertisement fees deducted directly from the seller account
- Easy to use with very little marketing knowledge required
Let’s start with creating your first sponsored ad campaign. Log in to your Amazon India seller account. (If you still haven’t registered as a seller at Amazon India, here is the step by step guide.)
Step 1 Creating a Campaign
On the seller-panel click Campaign Manager under Advertising Option. See below image.
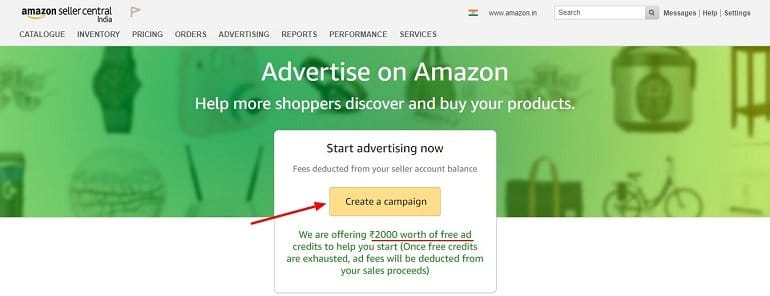
Click Create a Campaign.
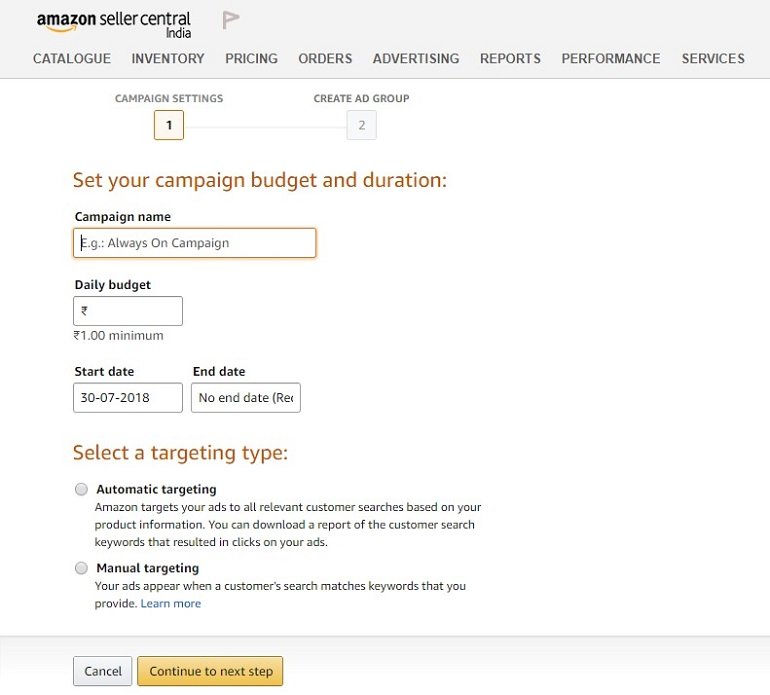
Name your ad campaign. Include the product or category name while naming an ad campaign. This makes selection easy when you want to analyze one particular ad campaign.
Set a daily budget here. This is the cost of running ads daily. When your campaign reaches the daily spend limit it will stop running automatically. You can start at as low as Rs. 100 (Though technically you can start for as low as Rs. 1 as well). Later one can increase the budget depending upon the campaign performance.
Campaign start date will be auto-filled as to current date. Leave end date empty. It is recommended not to set an end date. Let your campaign run for an extended time so that you can gather a decent amount of performance data.
When is Campaign End Date Recommended?
If you are running a Festival offer or say a Sale in your Amazon India store for a limited time and you want to advertise the same to buyers then the campaign settings will have an end date. You can, later on, extend the end date under campaign settings if you want to continue with the discount offer or sale.
If you find that your campaign is not performing the way you want, then set an end date under campaign settings and finish it off. Create another one.
Selecting Targeting Type
There are 2 ways to target your buyers on Amazon India. Automatic or Manual targeting. Get a brief intro on what are they.
What is Automatic Targeting?
Amazon India selects search terms from product title, bullet points, description and other information that you have given in the product listing page. It automatically shows your ads to the customer who is searching products with search keywords in your listing page.
What is Manual Targeting?
Here you need to provide a list of keywords, set each and every keyword bids individually and moreover monitor them daily so that your ads remain on the first page in search results. Manual targeting is not recommended for new sellers.
Select automatic targeting, click continue to next step.
Step 2 Creating Ad Group
Under a single campaign you can create multiple ad groups and under one ad group, you can create multiple ads.
Ad Campaign >> Ad Groups >> Product Ads
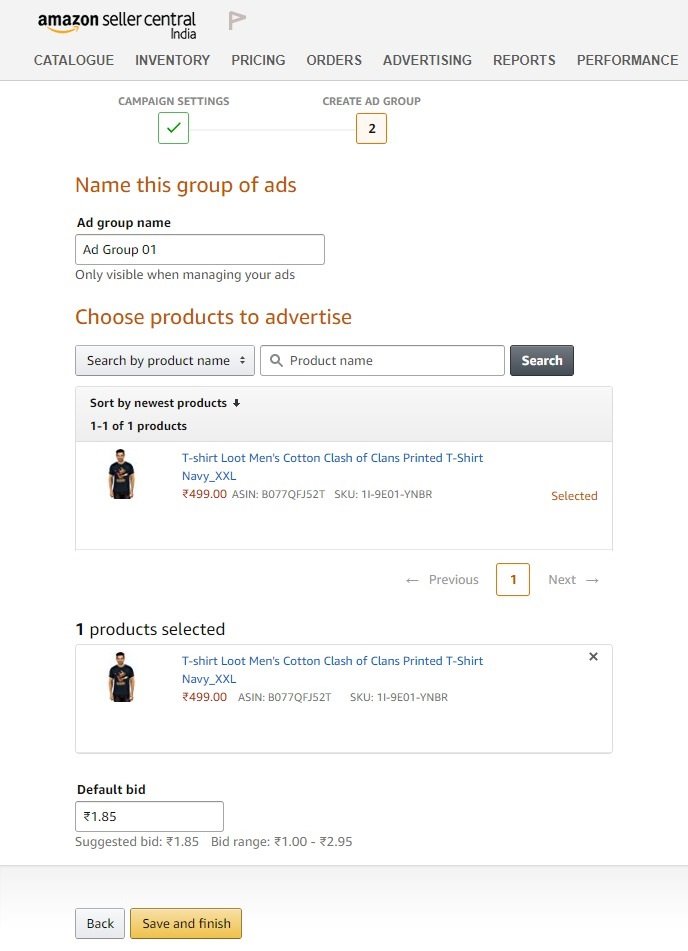
Name your ad group. Example Ad group 1, Men’s T-shirt ad group, T-shirt ad group January 2018 etc.
Choose Products to Advertise
You can select your products by Name, ASIN or SKU here or else chose products from the list below. A product list will be populated below that will show all your active products. Click select and continue. When you are done with the selection, all those selected products can be seen in a box below. Refer image above.
Set Default Bid
In the automatic targeting method, the system will select the default bid. It will also show the suggested bid along with bid range. The bid range as shown in the above image is Rs.1.00 to Rs.2.95. This means for every click on your product ad you will have to pay Amazon India any amount between Rs.1.00 to Rs.2.95.
Click Save and finish.
Upon successfully creating a campaign your ads will start running after 1 hour.

With the above message, you will be redirected to the “All Sponsored Product Campaigns” dashboard.
Understanding the Sponsored Product Campaign Dashboard
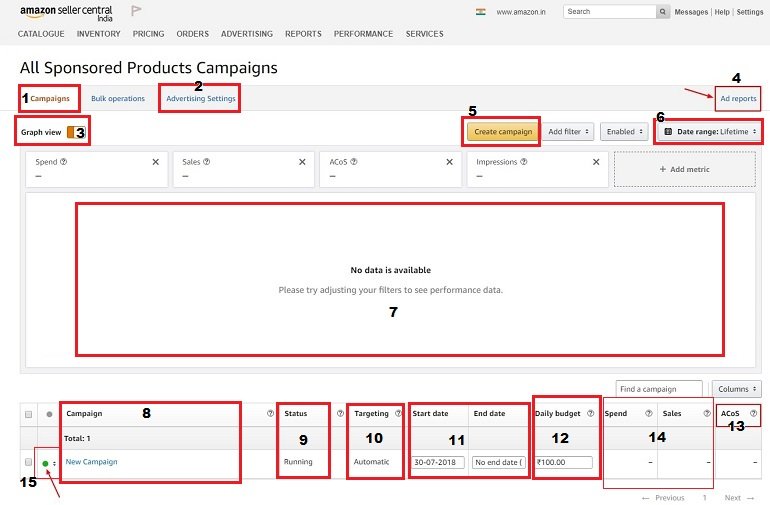
The number on the image represent each point as described below.
- Campaigns: It shows all the active running campaigns.
- Advertising Settings: It allows you to edit the campaign level daily budget.
- Graph View: It will show data in a graphical method on a daily, weekly or monthly basis.
- Ad Reports: Click here to generate customized advertising reports of sponsored products for analysis.
- Create Campaign: It creates another campaign. You can have multiple campaigns here.
- Data Range: It displays today, yesterday, week to date, last week, month to date, last month, year to date, lifetime and customized sponsored products data.
- Data Space: Here data will be displayed in a graphical view.
- Total Campaigns: List of all active campaigns displayed here.
- Status: Campaign status displayed here (Enabled, disabled or archived).
- Targeting: Campaign targeting mode displayed here (Automatic or Manual).
- Start and End Dates: Campaign start and end dates displayed here.
- Daily Budget: Campaigns level budget will be shown here. This budget can be edited here.
- ACOS: It is the advertising cost of sales. The amount that you spend to get sales. The ACOS shall not go beyond 20%. If it’s more than 20% than refurbish your campaign settings.
- Spend and Sales: This space shows the amount that you have spent and sales generated thereafter.
- Green button: The green color indicates that the campaign is running. You can enable, pause or archive campaigns here.
How to Change Campaign Level Settings?
Click campaign manager under advertising option. Scroll down and click on the campaign that you wish to edit.
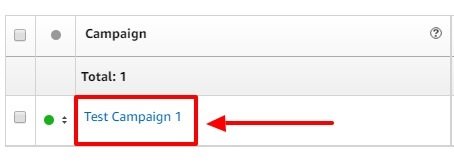
Now you are on “Test Campaign 1” page. Click Campaign Settings. You will see Basic Settings here. Except Campaign Targeting, you can edit any field. You can also set an end date for this campaign or increase the campaign level daily budget also.
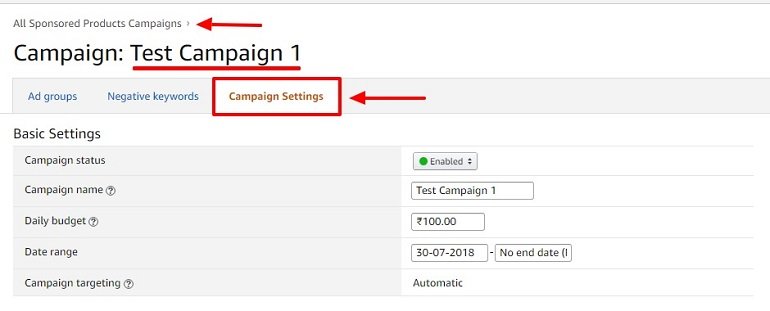
There is no save button here. The option that you edit pops up a separate save button. If you wish to return to the main dashboard then click the link “All Sponsored Products Campaigns“.
How to Change Ad Groups Settings?
Click campaign manager under advertising option. Scroll down and click on the campaign to locate the ad group for editing. For your reference, I have created a test ad group “Ad Group 1” in “Test Campaign 1“.
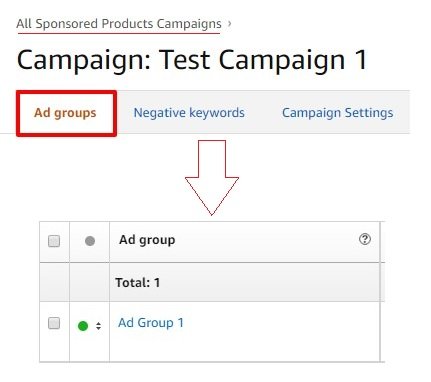
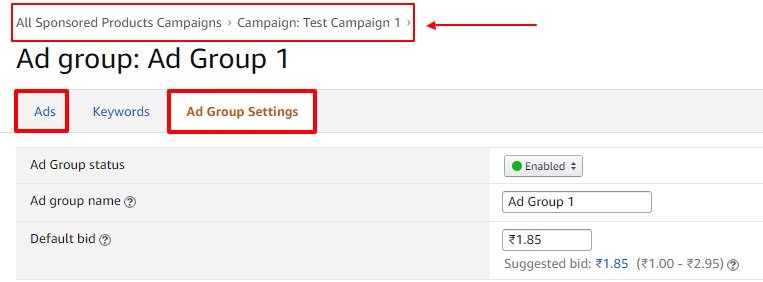
Here you can change your ad group status, ad group name, and default bid. All fields have separate save button. Click on “All Sponsored Products Campaigns” to return to campaign manager.
